A Simple Guide to Making Transparent Overlay Labels on Object Detection
If you wish to add transparent overlay labels to your detected bounding boxes without covering the underlying image, using transparent text overlay can be a great solution. A transparent text overlay is a text that is overlaid on top of an image with a partially transparent background, allowing the underlying image to show through.
To create transparent overlay labels, we can use a technique known as alpha blending. Alpha blending is a technique used in computer graphics to create the appearance of partial or full transparency by combining one image with a background (Wikipedia). In the context of transparent overlay labels, we can use the alpha blending to create a label text that has a partially transparent background.
This tutorial will show you how to add transparent overlay labels to your detected bounding boxes using Python and OpenCV. To follow along this tutorial, you would need to have OpenCV installed on your machine or your Conda environment. By the end, you’ll be able to add transparent labels to your object detection project.
To demonstrate this technique, we will be using an image from the COCO dataset along with its corresponding annotations. For your convenience in following along with the tutorial, I have created a Github repository that includes the code as well as both the image and its annotations. You can clone the repository from my Github.
Great! Let’s start this tutorial.
Project Directory Structure
If you have cloned or downloaded the Github repository from the link provided above, you’ll have the following structure after unzipping the folder:
TRANSPARENT_LABELS/
├── annotations/
│   └── 000000047983.txt
├── image/
│   └── 000000047983.jpg
├── main.py
└── trans_overlay.py
The annotations directory contains a single .txt file that serves as the annotation file for the corresponding image stored in the image directory.
The trans_overlay.py file defines the PutText function that adds a transparent overlay label to a bounding box.
The main.py file contains the main function. It imports the PutText function from the trans_overlay module, that enables the addition of transparent overlay labels. I will provide detailed explanations of both files in the following sections.
Ok, let’s first move to the trans_overlay.py file where we define the PutText function.
File trans_overlay.py
The trans_overlay.py file contains the code for the PutText function, which creates a transparent overlay label for a bounding box. The entire code for the trans_overlay.py file is shown below:
import cv2
import numpy as np
def PutText(image,
            text,
            pos=(0,0),
            text_color=(255,255,255),
            bg_color=(255,255,255),
            scale=1,
            thickness=1,
            margin=2,
            transparent=False,
            font=cv2.FONT_HERSHEY_SIMPLEX,
            alpha=0.5):

    txt_size = cv2.getTextSize(text, font, scale, thickness)
    w_text, h_text= txt_size[0][0], txt_size[0][1]

    x1_text = pos[0] + margin
    y1_text = pos[1] + h_text
    x1_rect = pos[0]
    y1_rect = pos[1]
    x2_rect = x1_rect + w_text + margin
    y2_rect = y1_rect + h_text + margin

    if transparent:
        mask = image.copy()
        cv2.rectangle(mask, (x1_rect, y1_rect), (x2_rect, y2_rect), bg_color, -1)
        image = cv2.addWeighted(image, 1 - alpha, mask, alpha, 0)
        cv2.putText(image, text, (x1_text,y1_text), font, scale, text_color, thickness, cv2.LINE_AA)
    else:
        cv2.rectangle(image, (x1_rect, y1_rect), (x2_rect, y2_rect), bg_color, -1)
        cv2.putText(image, text, (x1_text,y1_text), font, scale, text_color, thickness, cv2.LINE_AA)

    return image
This code defines a function called PutText that takes several parameters including an image as input, and returns the image with transparent overlay labels added to it.
Here is a breakdown of the function’s arguments and what the function does:
image: the input image on which the text will be written.text: the string of text that will be added to each bounding box on the image.pos: a tuple containing thexandyposition of the top-left corner of the bounding box. This position is used as the reference point for both drawing the text background and writing the text.text_color: the RGB color of the text. Default is white (255,255,255).bg_color: the RGB color of the background rectangle. Default is white (255,255,255).scale: the scale factor that determines the size of the text. Default is 1.thickness: the thickness of the text. Default is 1.margin: the number of pixels between the text box and the edge of the background rectangle. Default is 2.transparent: a boolean value that determines whether or not the background rectangle is transparent. Default is False.font: the font type of the text. Default iscv2.FONT_HERSHEY_SIMPLEX.alpha: the transparency level of the background rectangle. Default is 0.5.
Lines 15-16: We use the cv2.getTextSize function to obtain the dimensions of the text box. The function cv2.getTextSize returns a tuple containing a tuple of width and height of the text box in pixels and the distance between the bottom of the text box and the text baseline. The text baseline is the line on which the majority of letters sit. In our case, we only need the first element of the tuple that is a tuple containing width and height of the text box, which we can access directly as in line 15.
    txt_size = cv2.getTextSize(text, font, scale, thickness)
    w_text, h_text= txt_size[0][0], txt_size[0][1]
Lines 18-23:calculate the coordinates of the background rectangle based on the text size, position, and margin. The x1_text and y1_text represent the bottom-left corner of the text, while x1_rect, y1_rect, x2_rect, and y2_rect represent the coordinates of the four corners of the background rectangle of the text.
    x1_text = pos[0] + margin
    y1_text = pos[1] + h_text
    x1_rect = pos[0]
    y1_rect = pos[1]
    x2_rect = x1_rect + w_text + margin
    y2_rect = y1_rect + h_text + margin
Line 25: If the transparent flag is set to True, then the lines 26-29 will execute to create the transparent overlay label.
Lines 26-27: create a copy of the input image and store it in the variable mask and draw a rectangle on it using the coordinates x1_rect, y1_rect as the top-left corner and x2_rect, y2_rect as the bottom-right corner and fill it with the specified bg_color.
Line 28: uses the cv2.addWeighted() function to blend the mask image with the original image. The alpha is the parameter used to control the transparency of the mask. The resulting image is assigned back to the image variable.
Line 29: draws the text specified in the text variable on the blended image using the cv2.putText() function. The x1_text, y1_text coordinates specify the bottom-left corner of the text.
    if transparent:
        mask = image.copy()
        cv2.rectangle(mask, (x1_rect, y1_rect), (x2_rect, y2_rect), bg_color, -1)
        image = cv2.addWeighted(image, 1 - alpha, mask, alpha, 0)
        cv2.putText(image, text, (x1_text,y1_text), font, scale, text_color, thickness, cv2.LINE_AA)
    else:
        cv2.rectangle(image, (x1_rect, y1_rect), (x2_rect, y2_rect), bg_color, -1)
        cv2.putText(image, text, (x1_text,y1_text), font, scale, text_color, thickness, cv2.LINE_AA)
Lines 30-32:If the transparent flag is set to False, the cv2.rectangle function will draw a solid rectangle without transparency, and write the text specified in the text variable in using cv2.putText.
Line 34: the function returns the modified image, which is the image with transparent overlay labels added to it.
Ok, that’s it for the PutText function. Moving forward, we will be focusing on the main.py file.
File main.py
In main.py file, we have defined the main() function that contains the main code to create the transparent labels. Here is the complete code for the file:
import cv2
import numpy as np
from overlay import PutText
import os
import matplotlib.colors as mcolors


def main():
    current_dir = os.getcwd()
    im_path = os.path.join(current_dir,"images","000000047983.jpg")
    ann_path = os.path.join(current_dir,"annotations","000000047983.txt")

    image = cv2.imread(im_path)
    annotations = np.loadtxt(ann_path, dtype='str')

    class_names=["zebra","giraffe"]
    color_list=[(0,0,255),(255,0,0)]

    for ann in annotations:

        bbox = ann.split(',')
        bbox =  list(map(lambda x: int(float(x)), bbox))
        x, y, w, h, class_id = [int(b) for b in bbox]
        class_name = class_names[class_id]
        x1y1=(x,y)
        x2y2=(x+w,y+h)
        image = cv2.rectangle(image, (x1y1), (x2y2), color_list[class_id], 2)

        image = PutText(image,
                text=class_name,
                pos=x1y1,
                text_color=(255,255,255),
                bg_color=color_list[class_id],
                scale=0.7,
                thickness=1,
                margin=2,
                transparent=True,
                alpha=0.4)

    cv2.imshow("Transparent Labels",image)
    cv2.waitKey(0)

if __name__ == "__main__":
    main()
Let’s go through the code step by step.
Lines 9-11: specify the image and its annotations paths.
Lines 13-14: load the image and its annotations with the given paths.
Lines 16-17: define the class names and color list.
Line 19: iterates over a list of annotations using a for loop, where each annotation represents the bounding box and class ID for an object in the image.
Lines 21-23: split the annotation string to extract the bounding box coordinates and class ID. Then, the code converts the bounding box coordinates from strings to integers using map() and int(), and assigns the resulting integer values to individual variables x, y, w, h, and class_id.
Lines 25-26: create tuples representing the top-left and bottom-right corners of the bounding box, respectively. The tuple representing the top-left corner is assigned to the x1y1 variable, while the tuple representing the bottom-right corner is assigned to the x2y2 variable.
Line 27:draws a rectangle on the image using the coordinates of the top-left and bottom-right corners of the bounding box. The rectangle is drawn with the color corresponding to the class ID and a thickness of 2 pixels. The modified image is then assigned back to the image variable.
Lines 29-38:finally, we call the PutText() function from trans_overlay module to add a transparent label. This function receives the image, text, position, text color, background color, scale, thickness, margin, transparency, and alpha parameters. We set the transparent parameter to True to create a transparent rectangle, scale to 0.7, the thickness to 1, and the margin to 2, and set the alpha value to 0.4 to have the level of transparency. You can experiment with these values yourself to observe the results and choose the best one according to your needs.
Lines 40-41:display the resulting image using the cv2.imshow() function and keep the window open until any key is pressed.
Lines 43-44:code to execute the main() function.
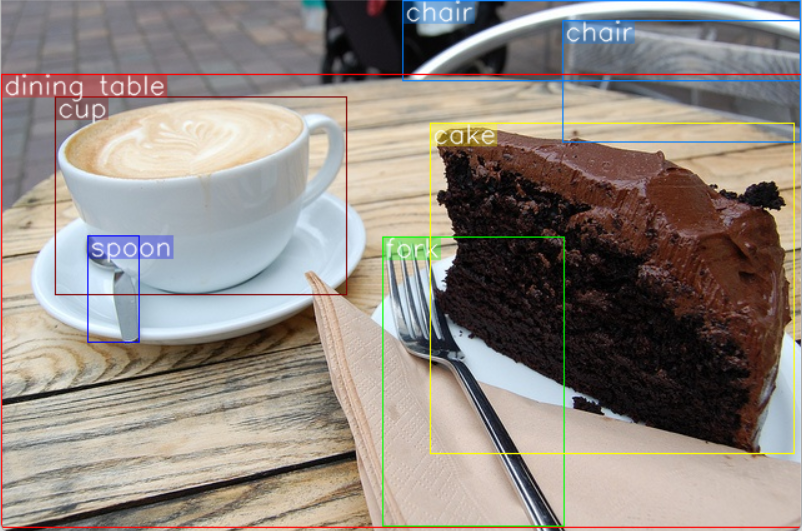
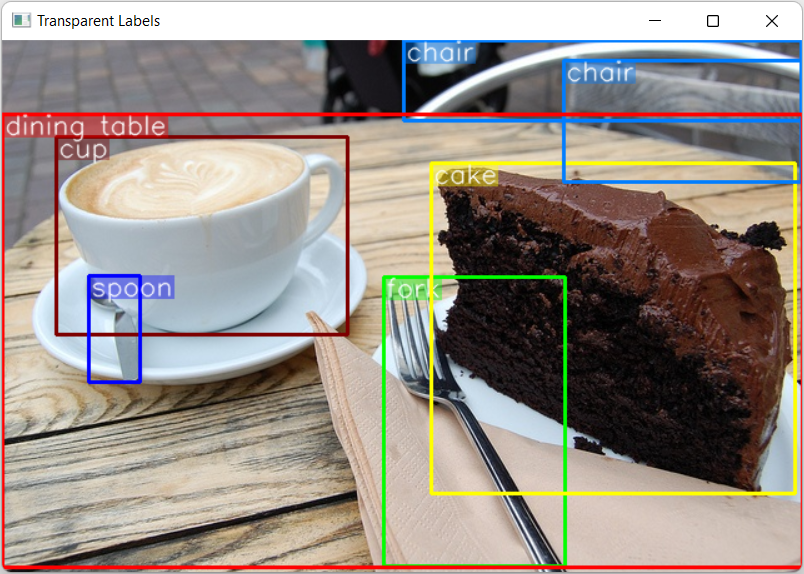
Now it’s time to test the code. If you successfully run the code, you will get a result like this. Try experimenting with the alpha parameter to get different transparent overlay labels.
You can also plot the result without using transparent overlay labels by setting the transparent flag to False. Then compare the results and choose which one is most convenient for you. In my opinion, transparent labels can be especially helpful when dealing with complex situations involving many detected objects. While solid background labels or labels without transparency can also be effective in some situations, however in a complex situation, it maybe difficult to distinguish between overlapping objects. Ultimately, the choice of label type depends on the specific needs of your application.
Conclusion
In this tutorial, we learned how to create transparent overlay labels using the alpha blending method in Python and OpenCV. In conclusion, utilizing alpha blending to create transparent overlay labels is an effective technique for visualizing detection results in object detection applications. By adjusting the transparency of the label using the alpha value, we can create transparent labels that do not completely obstruct the underlying image and offer a more attractive visualization compared to the use of the solid text backgrounds.
By following this tutorial, you can effectively create transparent overlay labels that can improve the visualization of object detection results.
Ok that’s it for this tutorial. I hope you enjoyed it.
Reference
Wikipedia, “Alpha_compositing”, https://en.wikipedia.org/wiki/Alpha_compositing.
Recently Posted Tutorials
- COCO Dataset: A Step-by-Step Guide to Loading and Visualizing with Custom Code
- A Comprehensive Guide to Gradient Descent Algorithm
- How to Create a Custom Dataset Class in PyTorch
- Intersection over Union (IoU): A comprehensive guide