COCO Dataset: A Step-by-Step Guide to Loading and Visualizing with Custom Code
If you are a beginner in the field of object detection, exploring the COCO (Common Objects in Context) dataset can be a valuable learning experience. This dataset is dedicated to object detection, segmentation, and captioning models, making it a popular choice for developers and researchers alike. The COCO dataset contains 330K images and 2.5 million object instances, making it a valuable resource for developing and testing computer vision algorithms. For further information on the COCO dataset, please visit its official website at http://cocodataset.org/.
I have created this comprehensive and beginner-friendly guide to give you a strong foundation for using the COCO dataset in your future object detection projects.
In this tutorial, I’ll walk you through the step-by-step process of loading and visualizing the COCO object detection dataset using custom code, without relying on the COCO API. This hands-on approach will help you gain a deeper understanding of the dataset’s structure and how it can be loaded into your projects.
By the end of this tutorial, you will have a strong foundation in working with the COCO dataset, and you’ll be ready to use it in your object detection projects.
Here are the steps that we will be covering in today’s tutorial:
- Downloading and Extracting the COCO dataset
- Understanding the structure of the COCO Format
- Creating the COCOParser Class
- Loading and Visualizing the Dataset
- Conclusion
It’s important to keep in mind that this tutorial will only focus on COCO dataset for object detection, not for segmentation. However, we will cover that topic in another tutorial.
IMPORTANT!
We will use a Google Colab notebook for this tutorial. I hope you guys are already familiar with it.
Great! Let’s begin our journey to mastering this dataset by downloading the COCO dataset to our Colab notebook. Go ahead and open your Colab notebook now to start the download process.
Step1: Downloading and Extracting the COCO Dataset
The COCO dataset can be downloaded from its official website, http://cocodataset.org/#download. We will be using a Google Colab notebook for this tutorial, and will download the files using the wget command and extract them using a Python script. To do so, simply copy and paste these commands into a new cell in your Colab notebook and execute them all.
!wget http://images.cocodataset.org/zips/train2017.zip -O coco_train2017.zip
!wget http://images.cocodataset.org/zips/val2017.zip -O coco_val2017.zip
!wget http://images.cocodataset.org/annotations/annotations_trainval2017.zip -O coco_ann2017.zip
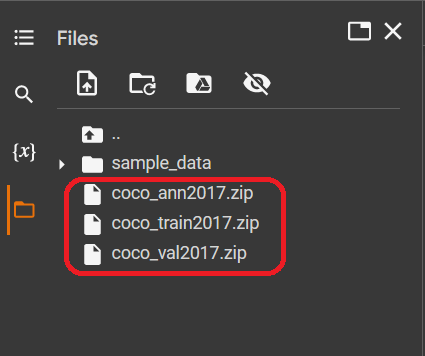
After the download has finished, you will have three zip files, which you can view on the left-hand side of the Colab notebook, as shown in the figure below.
Copy and paste the following code into a new cell in your Colab notebook, then execute it to extract the downloaded files. This will unzip the files to the specified destination directory and remove all the *.zip files once each file has been unzipped.
from zipfile import ZipFile, BadZipFile
import os

def extract_zip_file(extract_path):
    try:
        with ZipFile(extract_path+".zip") as zfile:
            zfile.extractall(extract_path)

        # remove zipfile
        zfileTOremove=f"{extract_path}"+".zip"
        if os.path.isfile(zfileTOremove):
            os.remove(zfileTOremove)
        else:
            print("Error: %s file not found" % zfileTOremove)

    except BadZipFile as e:
        print("Error:", e)


extract_train_path = "./coco_train2017"
extract_val_path = "./coco_val2017"
extract_ann_path="./coco_ann2017"

extract_zip_file(extract_train_path)
extract_zip_file(extract_val_path)
extract_zip_file(extract_ann_path)
After running the code, wait until it has fully executed. You will then have the three unzipped files, as shown in the following figure, and the .zip files will not be kept anymore.

If you explore the folders, you should see something similar to these figures.
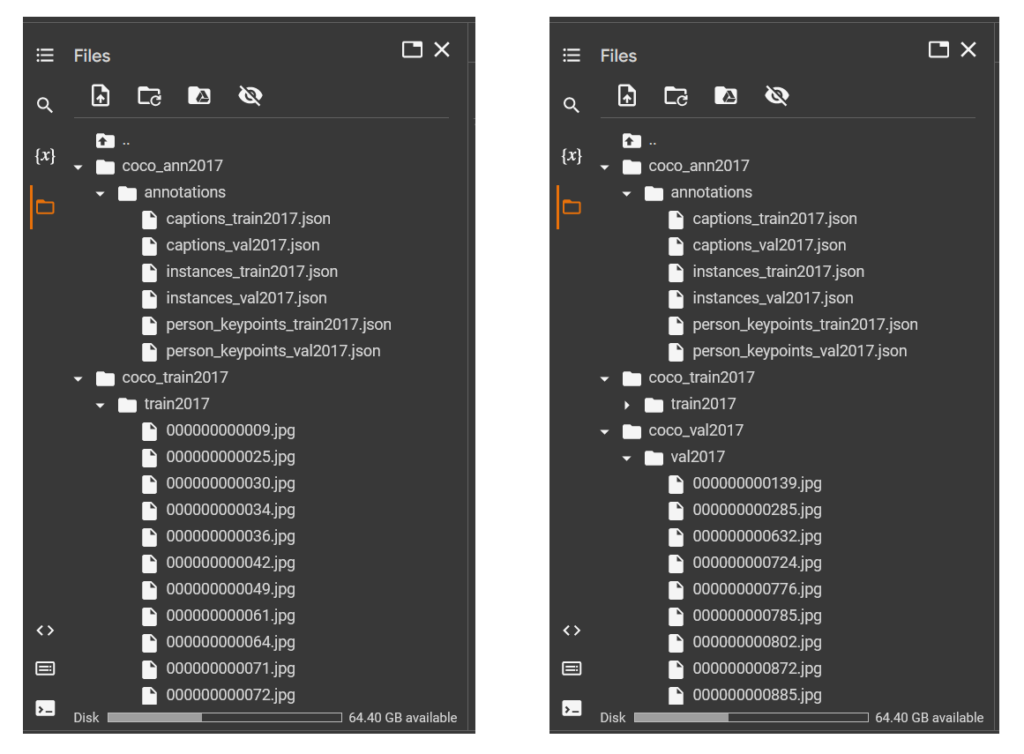
The folders “coco_train2017” and “coco_val2017” each contain images located in their respective subfolders, “train2017” and “val2017”. The folder “coco_ann2017” has six JSON format annotation files in its “annotations” subfolder, but for the purpose of our tutorial, we will focus on either the “instances_train2017.json” or the “instances_val2017.json”.
Great! Now, we will move forwad to look the COCO dataset format.
Step 2: Understanding the structure of the COCO Format
The COCO dataset annotations are stored in a JSON file format. Details of COCO dataset format can be found in the official website: https://cocodataset.org/#format-data.
To experiment with the dataset for object detection, you can use the annotation file either the “instances_val2017.json” or the “instances_train2017.json” files, as both have the same format. However, the “instances_train2017.json” file is large in size, so it is easier to work with the smaller “instances_val2017.json” file. Here is a simplified JSON format of the files:
{
    "info":
    { "description": "COCO 2017 Dataset",
        "url": "http://cocodataset.org",
        "version": "1.0",
        "year": 2017,
        "contributor": "COCO Consortium",
        "date_created": "2017/09/01"
    },
    "licenses":
    [
        {"url": "http://creativecommons.org/licenses/by-nc-sa/2.0/","id": 1,"name": "Attribution-NonCommercial-ShareAlike License"},
        {"url": "http://creativecommons.org/licenses/by-nc/2.0/","id": 2,"name": "Attribution-NonCommercial License"},
        ...,
        ...
    ],

    "images":
    [
        {"license": 4,"file_name": "000000397133.jpg","coco_url": "http://images.cocodataset.org/val2017/000000397133.jpg","height": 427,"width": 640,"date_captured": "2013-11-14 17:02:52","flickr_url": "http://farm7.staticflickr.com/6116/6255196340_da26cf2c9e_z.jpg","id": 397133},
        {"license": 1,"file_name": "000000037777.jpg","coco_url": "http://images.cocodataset.org/val2017/000000037777.jpg","height": 230,"width": 352,"date_captured": "2013-11-14 20:55:31","flickr_url": "http://farm9.staticflickr.com/8429/7839199426_f6d48aa585_z.jpg","id": 37777},
        ...,
        ...
    ],

    "annotations":
    [
        {"segmentation": [[510.66,423.01,511.72,...,...]],"area": 702.1057499999998,"iscrowd": 0,"image_id": 289343,"bbox": [473.07,395.93,38.65,28.67],"category_id": 18,"id": 1768},
        {"segmentation": [[289.74,443.39,302.29,...,...]],"area": 27718.476299999995,"iscrowd": 0,"image_id": 61471,"bbox": [272.1,200.23,151.97,279.77],"category_id": 18,"id": 1773}
        ...,
        ...
    ],
    "categories":
    [
        {"supercategory": "person","id": 1,"name": "person"},
        {"supercategory": "vehicle","id": 2,"name": "bicycle"},
        ...,
        ...
    ]
}
As you can see from the COCO dataset format above, it has a principle dictionary that is organized into five “keys” components, including “info“, “licenses“, “images“, “annotations“, and “categories“. Here is a brief explanation of each component:
Info
The “info” component provides metadata about the COCO dataset, including the version number, the date it was created, and the contact information for the creators of the dataset.
"info":
{ "description": "COCO 2017 Dataset",
    "url": "http://cocodataset.org",
    "version": "1.0",
    "year": 2017,
    "contributor": "COCO Consortium",
    "date_created": "2017/09/01"
}
Licenses
The “licenses” component provides the “url” to the complete license agreement, a unique identifier “id” for the license, and the “name” of the license. This information helps ensure that the data is used responsibly and ethically, and that users are aware of their rights and obligations when using the COCO dataset.
"licenses":
[
    {
        "url": "http://creativecommons.org/licenses/by-nc-sa/2.0/",
        "id": 1,
        "name": "Attribution-NonCommercial-ShareAlike License"
    },
    ...,
    ...,
    ...
]
Images
The “images” component contains a list of dictionary where each dictionary represents information about a single image in the COCO dataset in key-value pairs as the following:
"license": an integer value indicating the license type of the image. This value corresponds to the license"id"in the"licenses"component."file_name": a string containing the name of the image file."coco_url": a string containing a URL to the image on the COCO website."height": an integer value representing the height of the image in pixels."width": an integer value representing the width of the image in pixels."date_captured": a string representing the date and time that the image was captured."flickr_url": a string containing a URL to the image on Flickr."id": a unique identifier for the image, as an integer value.
"images":
[
    {
        "license": 4,
        "file_name": "000000397133.jpg",
        "coco_url": "http://images.cocodataset.org/val2017/000000397133.jpg",
        "height": 427,
        "width": 640,
        "date_captured": "2013-11-14 17:02:52",
        "flickr_url": "http://farm7.staticflickr.com/6116/6255196340_da26cf2c9e_z.jpg",
        "id": 397133
    },
    ...,
    ...,
    ...
]
Annotations
The "annotations" components holds a list of dictionaries, each dictionary represents the data for an object within an image in the COCO dataset. The key-value pairs in each dictionary are:
"segmentation": The “segmentation” key in an annotation dictionary holds a list of floating point numbers that represent the pixel coordinates of an object’s segmentation mask. They can be used to plot the segmentation mask of the object on an image. To plot the mask, we need to take pairs of numbers (the first and second value, then the third and fourth, etc.) and use them as the x and y coordinates of the pixels."area": a floating point value indicating the area of the object in segmentation mask in pixels squared."iscrowd": a binary integer value indicating whether the object is part of a crowd (1) or not (0)."image_id": an integer value that is a unique identifier for the image in which the object appears. This"image_id"corresponds to the"id"in"image"component."bbox": a list of four floating point values representing the bounding box of the object in the format[x, y, width, height]."category_id": an integer value indicating the category or class of the object."id": a unique identifier for the annotation across the entire COCO dataset, as an integer value.
"annotations":
[
    {
        "segmentation": [[510.66,423.01,511.72,...,...,...]],
        "area": 702.1057499999998,
        "iscrowd": 0,
        "image_id": 289343,
        "bbox": [473.07,395.93,38.65,28.67],
        "category_id": 18,
        "id": 1768
    },
    ...,
    ...,
    ...
]
Categories
The “categories” component of the COCO dataset is a list of dictionaries, each representing a different object class that can be annotated in the images of the dataset. Each dictionary in the list has three key-value pairs:
- “supercategory”: a string indicating the supercategory or super class of an object. For example, in the second dictionary, “vehicle” is the supercategory of the bicycle.
- “id”: a unique identifier for identifying the category of an object , as an integer value.
- “name”: a string that represents the name of the category.
"categories":
[
    {
        "supercategory": "person",
        "id": 1,
        "name": "person"
    },
    {
        "supercategory": "vehicle",
        "id": 2,
        "name": "bicycle"
    },
    ...,
    ...,
    ...
]
COCO dataset defines 91 object categories in total, but not all of these categories are used in the actual data. Only 80 of the 91 defined categories are used in the dataset.
Great! Now, we have a comprehensive understanding of the COCO dataset format, let’s move on to the next step of our journey: Creating COCOParser Class.
Step 3: Creating the COCOParser Class
COCO dataset stores the annotations in JSON files. To parse these files, we need to load them into memory and extract the relevant information. There are many libraries in Python that can help us parse JSON files, including the built-in json module. So, in this tutorial we are going to use the built-in json module to parse the COCO annotations.
The following is the code for the COCOParser() class. Please copy and paste it into a new cell of your Colab notebook, and then execute it.
from collections import defaultdict
import json
import numpy as np

class COCOParser:
    def __init__(self, anns_file, imgs_dir):
        with open(anns_file, 'r') as f:
            coco = json.load(f)

        self.annIm_dict = defaultdict(list)
        self.cat_dict = {}
        self.annId_dict = {}
        self.im_dict = {}
        self.licenses_dict = {}

        for ann in coco['annotations']:
            self.annIm_dict[ann['image_id']].append(ann)
            self.annId_dict[ann['id']]=ann
        for img in coco['images']:
            self.im_dict[img['id']] = img
        for cat in coco['categories']:
            self.cat_dict[cat['id']] = cat
        for license in coco['licenses']:
            self.licenses_dict[license['id']] = license

    def get_imgIds(self):
        return list(self.im_dict.keys())

    def get_annIds(self, im_ids):
        im_ids=im_ids if isinstance(im_ids, list) else [im_ids]
        return [ann['id'] for im_id in im_ids for ann in self.annIm_dict[im_id]]

    def load_anns(self, ann_ids):
        im_ids=ann_ids if isinstance(ann_ids, list) else [ann_ids]
        return [self.annId_dict[ann_id] for ann_id in ann_ids]

    def load_cats(self, class_ids):
        class_ids=class_ids if isinstance(class_ids, list) else [class_ids]
        return [self.cat_dict[class_id] for class_id in class_ids]

    def get_imgLicenses(self,im_ids):
        im_ids=im_ids if isinstance(im_ids, list) else [im_ids]
        lic_ids = [self.im_dict[im_id]["license"] for im_id in im_ids]
        return [self.licenses_dict[lic_id] for lic_id in lic_ids]
We define the cocoParser() class with five methods as follows:
__init__(self, anns_file, imgs_dir)get_imgIds(self)get_annIds(self, im_ids)load_anns(self, ann_ids)load_cats(self, class_ids)
Let’s take a closer look at each of these methods individually.
 (
( ,
,  ,
,  )
)
Lines 7 - 8: reads the annotation JSON file using json library and stored in the coco variable.
Lines 10 - 14: create five dictionaries as instance variables to store data that will be read from the coco variable. These dictionaries are:
self.annIm_dict, a defaultdict that associates an image ID with a list of annotations. Thedefaultdicttype is used here so that if a key does not exist in the dictionary yet, it will automatically be created with a default value of an empty list.self.cat_dict, a dictionary that maps a category ID to the corresponding category information. This is a regular dictionary (not adefaultdict) and is used to store and retrieve annotations based on their ID.self.annId_dict, a dictionary that connects an annotation ID to the corresponding annotation information. This is also a regular dictionary and is used to store and retrieve images based on their ID.self.im_dict, a dictionary that links an image ID to the corresponding image information. This is also a regular dictionary and is used to store and retrieve images based on their ID.self.licenses_dict, a dictionary that associates a license ID with the corresponding license information. This is also a regular dictionary and is used to store and retrieve images based on their ID.
 (
( )
)
    def get_imgIds(self):
        return list(self.im_dict.keys())
The method get_imgIds() returns a list of all image IDs stored in the self.im_dict dictionary, which links image IDs to their corresponding image information. The image IDs are easily accessible by getting the keys of self.im_dict.
 (,
(,  )
)
The method get_annIds() takes im_ids, which is a list of image IDs, as an input parameter and returns the list of annotation IDs.
    def get_annIds(self, im_ids):
        im_ids=im_ids if isinstance(im_ids, list) else [im_ids]
        return [ann['id'] for im_id in im_ids for ann in self.annIm_dict[im_id]]
Line 30: verifies the type of im_ids to see if it’s a list or not. If it’s not a list (i.e. an integer), it will be converted to a single-item list.
This is necessary because if a single integer ID is passed as an argument, the code will not be able to iterate over it (a single integer cannot be iterated over), causing a TypeError and preventing the method from returning the correct result.
Line 31: we simply code it in a list comprehension to make it concise. Hope it’s not that difficult to understand. It basically generates a list of annotation IDs by iterating over each im_id in the list im_ids, and for each im_id, it extracts the id value of each annotation associated with that image from the dictionary self.annIm_dict. The extracted annotation IDs are then combined into a single list which is returned as the result of the method.
 (,
(,  )
)
The method load_anns() is used to retrieve information associated with a given list of annotation IDs as the input parameter. It takes ann_ids, which is a list of annotation IDs, as an input parameter and returns the list of annotations.
    def load_anns(self, ann_ids):
        im_ids=ann_ids if isinstance(ann_ids, list) else [ann_ids]
        return [self.annId_dict[ann_id] for ann_id in ann_ids]
Line 34: the same case as in the method get_annIds() line 30, that it needs to check the type of ann_ids whether a list or a single integer ID. In case it’s not a list, it will be converted to a single-item list.
Line 35: similar to the method get_annIds(), this line uses a list comprehension to get a list of annotations. For each annotation ID ann_id in ann_ids, it retrieves the corresponding annotation from the dictionary self.annId_dict and adds it to the result list. The final result is a list of annotations corresponding to the given annotation IDs in ann_ids.
 (,
(,  )
)
The method load_cats() accepts a parameter class_ids, which may be either a single class ID or a list of class IDs, and returns the list of categories associated with the given class_ids.
    def load_cats(self, class_ids):
        class_ids=class_ids if isinstance(class_ids, list) else [class_ids]
        return [self.cat_dict[class_id] for class_id in class_ids]
Line 38: the same case as in the lines 30 and 34 that it needs to check the type of class_ids. It will convert the given class_ids to a single-item list if it’s not a list.
Line 39: uses a list comprehension to extract the category information from the dictionary self.cat_dict associated with each class ID, and returns a list of categories corresponding to the given class_ids.
 (, )
(, )
The method get_imgLicenses() receives a parameter im_ids, which can either be a single image ID or a list of image IDs, and returns a list of licenses corresponding to each image ID in the list im_ids.
    def get_imgLicenses(self,im_ids):
        im_ids=im_ids if isinstance(im_ids, list) else [im_ids]
        lic_ids = [self.im_dict[im_id]["license"] for im_id in im_ids]
        return [self.licenses_dict[lic_id] for lic_id in lic_ids]
Line 42: similar to the line 30 in the method get_annIds(), it also checks the type of im_ids and converts it into a single-item list if it’s not a list.
Line 43: uses a list comprehension to extract the license IDs of each im_id in im_ids from the dictionary self.im_dict. Each license ID in the dictionary self.im_dict is associated with the key "license".
Line 44: another list comprehension is used to retrieve and return the license information from the self.licenses_dict dictionary for each license ID lic_id in lic_ids, which are obtained in line 43.
Ok guys, that’s it for the COCOparser() class.
Next, we’re moving forward to test what we’ve created.
Step 4: Loading and Visualizing the Dataset
Let’s start by creating the object of the COCOParser() class. Copy and paste this code into a new cell of your Colab notebook, and execute it.
coco_annotations_file="/content/coco_ann2017/annotations/instances_val2017.json"
coco_images_dir="/content/coco_val2017/val2017"
coco= COCOParser(coco_annotations_file, coco_images_dir)
The line coco = COCOParser(coco_annotations_file, coco_images_dir) creates an instance of the COCOParser() class, passing the file paths stored in coco_annotations_file and coco_images_dir as arguments. This instance can now be used to access and manipulate the annotations and images in the COCO dataset.
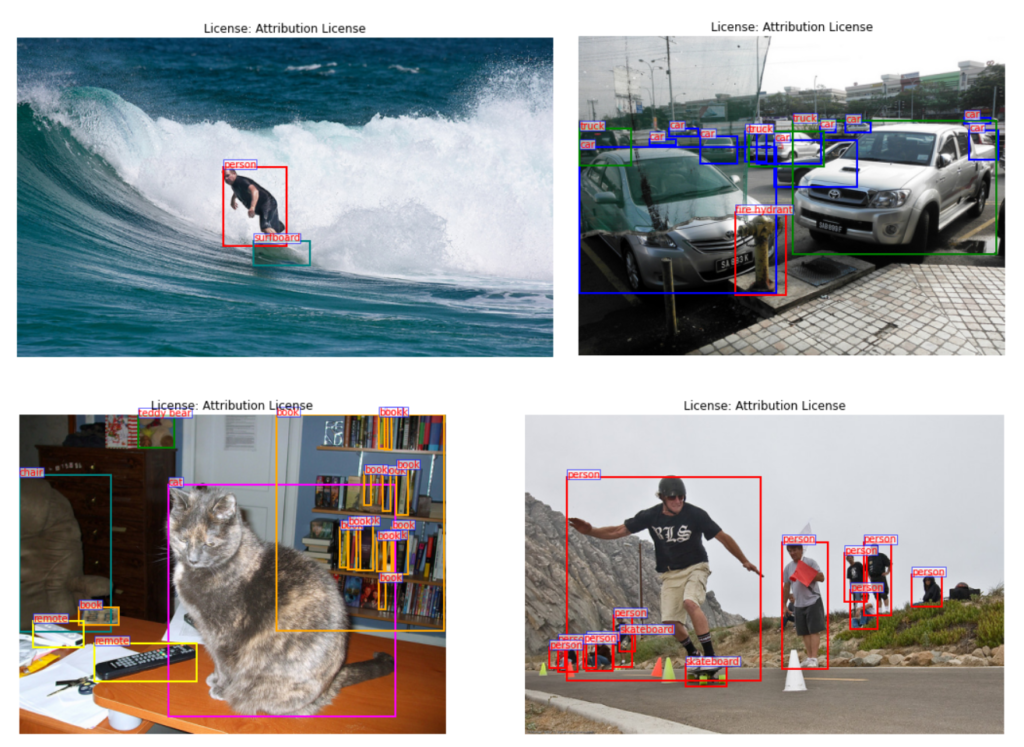
Great! Let’s now load the dataset and visualize the objects in the images by displaying the bounding boxes around them along with their respective class names. Additionally, we will display the license information for each image.
import matplotlib.pyplot as plt
from PIL import Image
import numpy as np

# define a list of colors for drawing bounding boxes
color_list = ["pink", "red", "teal", "blue", "orange", "yellow", "black", "magenta","green","aqua"]*10

num_imgs_to_disp = 4
total_images = len(coco.get_imgIds()) # total number of images
sel_im_idxs = np.random.permutation(total_images)[:num_imgs_to_disp]

img_ids = coco.get_imgIds()
selected_img_ids = [img_ids[i] for i in sel_im_idxs]

ann_ids = coco.get_annIds(selected_img_ids)
im_licenses = coco.get_imgLicenses(selected_img_ids)

fig, ax = plt.subplots(nrows=2, ncols=2, figsize=(15,10))
ax = ax.ravel()

for i, im in enumerate(selected_img_ids):
    image = Image.open(f"{coco_images_dir}/{str(im).zfill(12)}.jpg")
    ann_ids = coco.get_annIds(im)
    annotations = coco.load_anns(ann_ids)
    for ann in annotations:
        bbox = ann['bbox']
        x, y, w, h = [int(b) for b in bbox]
        class_id = ann["category_id"]
        class_name = coco.load_cats(class_id)[0]["name"]
        license = coco.get_imgLicenses(im)[0]["name"]
        color_ = color_list[class_id]
        rect = plt.Rectangle((x, y), w, h, linewidth=2, edgecolor=color_, facecolor='none')

        t_box=ax[i].text(x, y, class_name,  color='red', fontsize=10)
        t_box.set_bbox(dict(boxstyle='square, pad=0',facecolor='white', alpha=0.6, edgecolor='blue'))
        ax[i].add_patch(rect)


    ax[i].axis('off')
    ax[i].imshow(image)
    ax[i].set_xlabel('Longitude')
    ax[i].set_title(f"License: {license}")

plt.tight_layout()
plt.show()
Let’s break down the code to help you better understand.
Line 1 - 3: import the necessary libraries
Line 4: defines a list of colors to use for drawing bounding boxes around objects in images. We repeated 10 times to have enough contrast colors to display a large number of objects (80 classes).
Line 8: set the variable num_imgs_to_disp (the number of images to display) to 4.
Line 9: sets the variable total_images (the total number of images in the dataset) to the total length of the list of all image IDs in the dataset, which mean the same as we get the total number of images in the dataset.
The function coco.get_imgIds() returns a list of all image IDs in the dataset. We can get the length of this list with the len() function.
Line 10: randomly selects the first num_imgs_to_disp numbers from the random permutation array of total_images to be used as indices to select num_imgs_to_disp image IDs. The list of selected numbers is stored in the variable sel_im_idxs.
The function np.random.permutation(total_images) randomly generates a random permutation of numbers 0 to total_images and after that we convert them to a list using list() syntax. Then the slicing syntax [:num_imgs_to_disp] is used to select the first num_imgs_to_disp numbers.
For example, if there are a total of 10 images (total_images = 10), and we want to display 3 images (num_imgs_to_disp = 3), and let’s say the random permutation list is [7, 9, 0, 5, 8, 2, 3, 1, 6, 4], then the first num_imgs_to_disp numbers from the list would be a list of [7,9,0].
Lines 12-13: obtain the IDs of the selected images.
The function coco.get_imgIds() returns a list of all image IDs img_ids in the dataset. The selected_img_ids is a list of IDs of the selected images obtained by indexing into img_ids with the random indices previously stored in sel_im_idxs.
Line 15: gets the IDs of the annotations (i.e., object instances) in the selected images.
The function coco.get_annIds(selected_img_ids) returns a list of annotation IDs corresponding to the selected images selected_img_ids.
Line 16: gets the licenses of the selected images.
The function coco.get_imgLicenses(selected_img_ids) returns a list of license information for the selected images selected_img_ids.
Line 18: creates a 2×2 grid of subplots to plot four images in a single figure.
Line 21:Loops over a list of selected image IDs (selected_img_ids) using enumerate.
Line 22: Opens the corresponding image file using the Image module.
Line 23: Gets the annotation IDs associated with the current image using the coco.get_annIds method.
Line 24: Loads the annotations for the current image using the coco.load_anns method.
Line 25: Loops over the annotations for the current image.
Line 26 - 28: Extract the bounding box coordinates and class ID from each annotation.
Line 29: Gets the class name for the current class ID using the coco.load_cats method.
Line 30: Gets the license for the current image using the coco.get_imgLicenses method.
Line 32: Creates a rectangle object for the bounding box using plt.Rectangle and adds it to the current plot axis.
Line 34 - 36: Add a text box with the class name on top of the bounding box.
Okay, now let’s execute the code. Congratulations! You have successfully loaded and visualized the COCO dataset using your custom code.
Try executing the code multiple times to observe the different images and their respective objects.
Alright! That’s it for today’s tutorial. Hope you guys enjoy it.
Conclusion
In this tutorial, we have covered the process of working with the COCO object detection dataset. We started by downloading and extracting the dataset on our Colab notebook, and then went on to understand the structure of the dataset. We also created a custom class, the COCOParser() Class, to load and visualize the dataset in a more hands-on approach.
By following these steps, you should now have a solid foundation in working with the COCO dataset and be able to use it in your object detection projects. I hope this tutorial has been helpful and informative, and I look forward to seeing the exciting projects you will create using the COCO dataset. See you guys in another tutorial.
The complete code for this tutorial can be found at the following link: COCO Dataset Loader.
Recently Posted Tutorials
- A Comprehensive Guide to Gradient Descent Algorithm
- How to Create a Custom Dataset Class in PyTorch
- Intersection over Union (IoU): A comprehensive guide
What others say
Also that we would do without your remarkable idea
_ _ _ _ _ _ _ _ _ _ _ _ _ _
Nekultsy Ivan dism github
urenrjrjkvnm
Life
Novost
coin
coin
Novost
urenrjrjkvnm
Ukraine
Novost
urenrjrjkvnm
coin
Novost