Intersection over Union (IoU): A comprehensive guide
Today, we will cover IoU (Intersection over Union) and how to implement it in Python. If you are new to the field of object detection, understanding of IoU and knowing how to code it can help you gain a deeper understanding of object detection algorithms. This is because IoU is one of key metrics used to evaluate the performance of object detection models and is used to measure the similarity between the predicted bounding box and the ground truth bounding box. It is commonly used to evaluate the performance of object detection models and during model training.
So, after completing this tutorial, you will gain an understanding of Intersection over Union (IoU), including its derivation and implementation in Python using Pytorch library.
Here is the outline that we will be covering today:
- What is IoU?
- Calculating Intersection Area
- Calculating Union Area
- Special Cases (No Intersection)
- Python Implementation
- Conclusion
Let’s get started.
What is IoU?
In object detection, Intersection over Union (IoU) is a measure used to evaluate the performance of an algorithm in detecting objects within an image. It is computed as the ratio of the intersection of the predicted bounding box and the ground truth bounding box to the union of the two bounding boxes. Where, a value of 1 indicates perfect overlap, while a value of 0 indicates no overlap. A predicted bounding box is considered a “correct” detection if its IoU score is higher than a specified threshold.
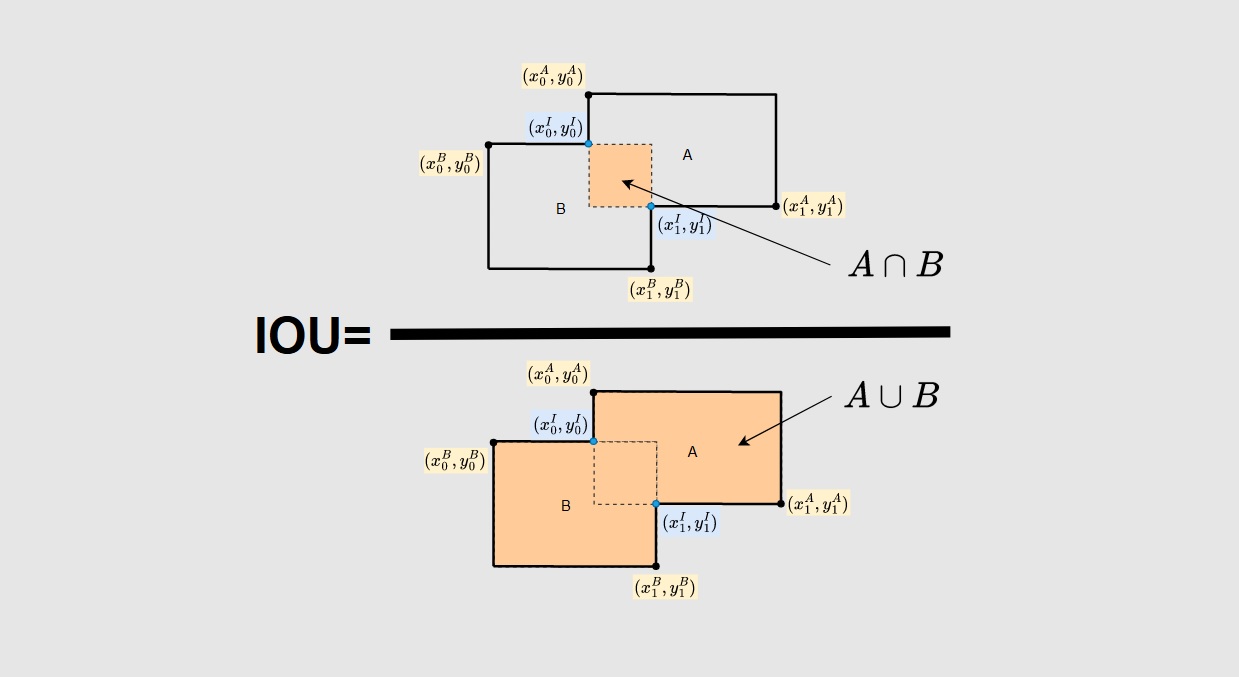
If two boxes overlap or intersect each other as described in the following figure, we can calculate the IoU by finding the ratio of the area of overlap between the two boxes to the total area of the combined boxes.
The IoU between two overlapping boxes is denoted as:
(1) 
Let’s consider that each box is represented by its upper-left corner  , and its bottom-right corner
  . If we have two boxes
  and
and  , we can use a superscript or to indicate the corners of each specific box.
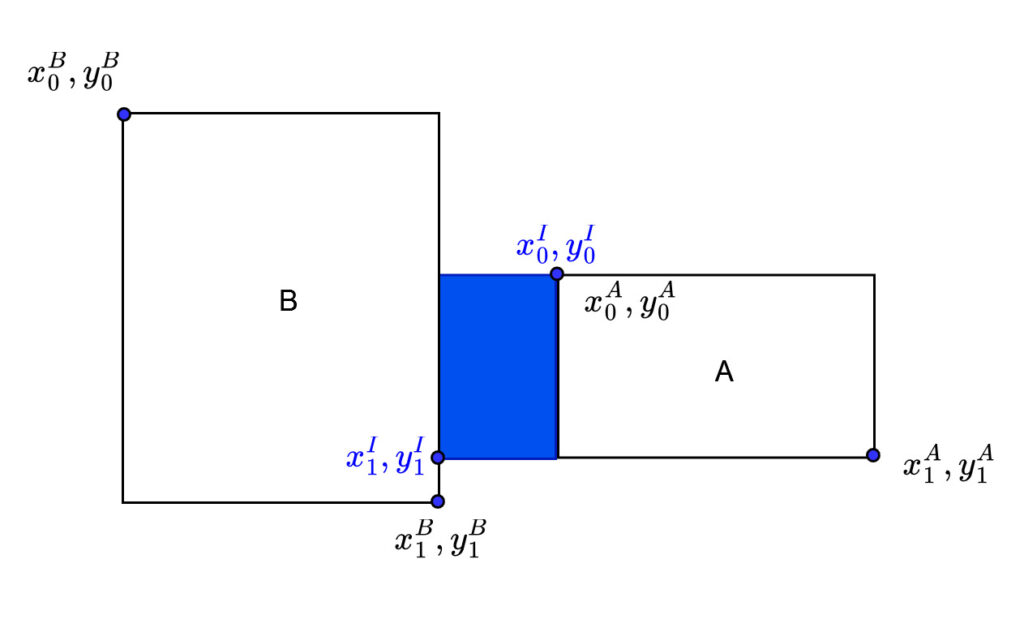
The figure below illustrates the method for determining the IoU between two intersecting boxes.
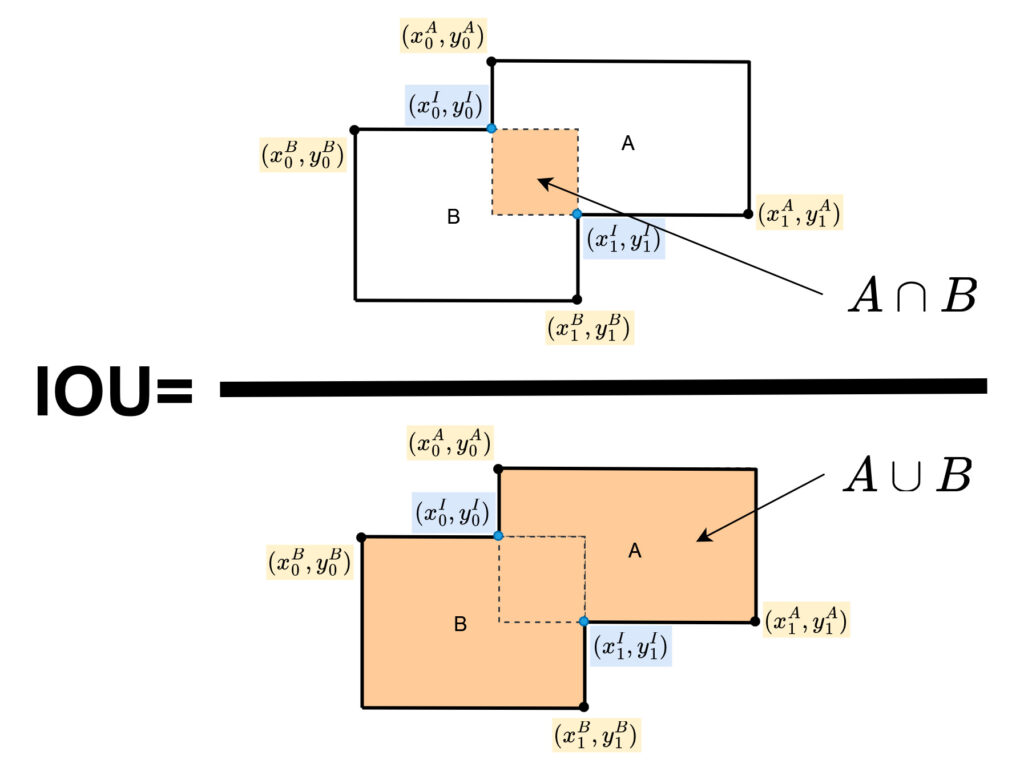
In order to calculate the Intersection over Union (IoU), two terms must be computed: the intesection area ( ) and the union area (
 ). Let’s explore each in detail.
Calculating Intersection Area
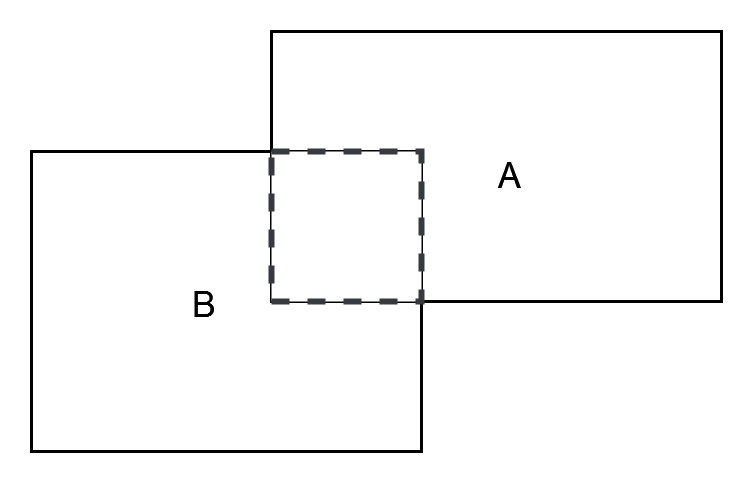
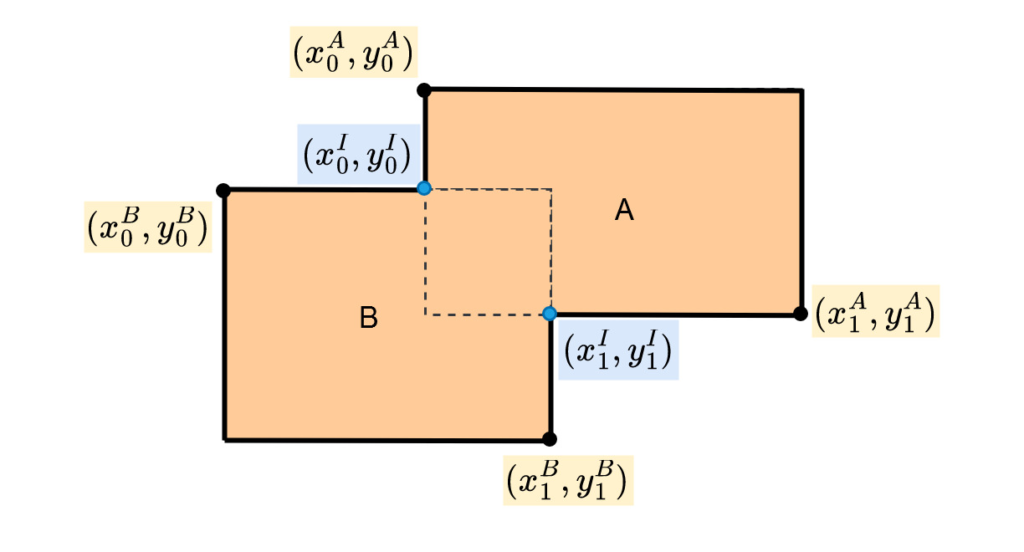
The figure below illustrates how we can find the upper-left corner  , and bottom-right corner
  of the intersection area between two overlapping boxes. A superscript
  indicates the intersection area.
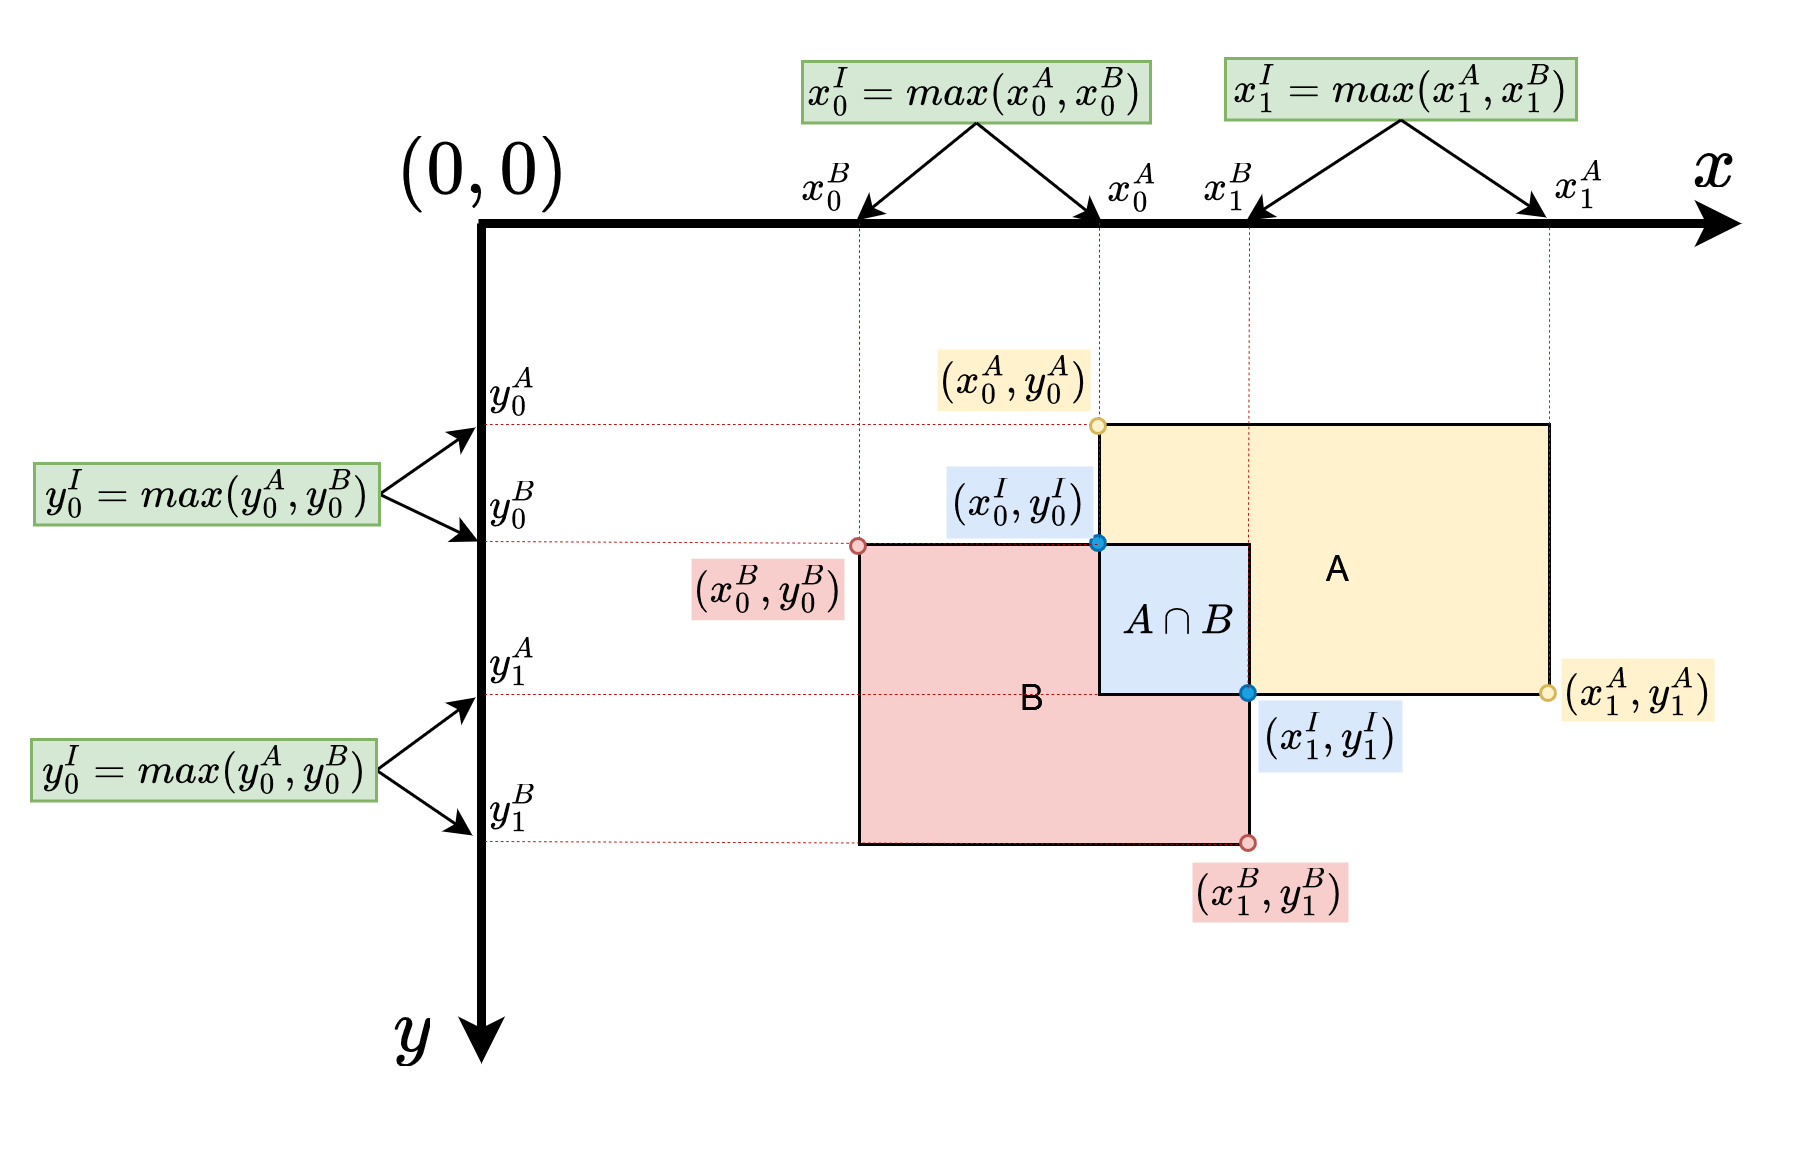
So, for coordinates of the intersection area, we have:
 =
=  (
( ,
,  )
) = (
= ( ,
,  )
) =
=  (
( ,
,  )
) = (
= ( ,
,  )
)
Then, we can calculate the intersection area  as follows:
(2) 
Great! Let’s now see the calculation of the union area
Calculating Union Area
The union area of two boxes can be obtained by adding the area of both boxes and subtracting the area of their intersection.
Mathematically, the union area of  and
and  (
( ) is defined as the combination of the two boxes’ areas minus their intersection area, as follows:
(3) 
Where:
(4) 
(5) 
Finally, we can calculate the IoU as follows:
(6) 
Now, let’s look at two special cases where there is no intersection between the two boxes.
Special Cases (No Intersection)
I will demonstrate two cases where there is no intersection between the two boxes.
First Case
Let’s see the first one.

In this case, we have two bounding boxes that don’t overlap. So, when we apply the following formulas:
- = (, )
- = (, )
- = (, )
- = (, )
we get:
- =

- =
- =
- =
Then, we can draw a region covered by these two opposite corners as false intersection box, as depicted in the figure below.
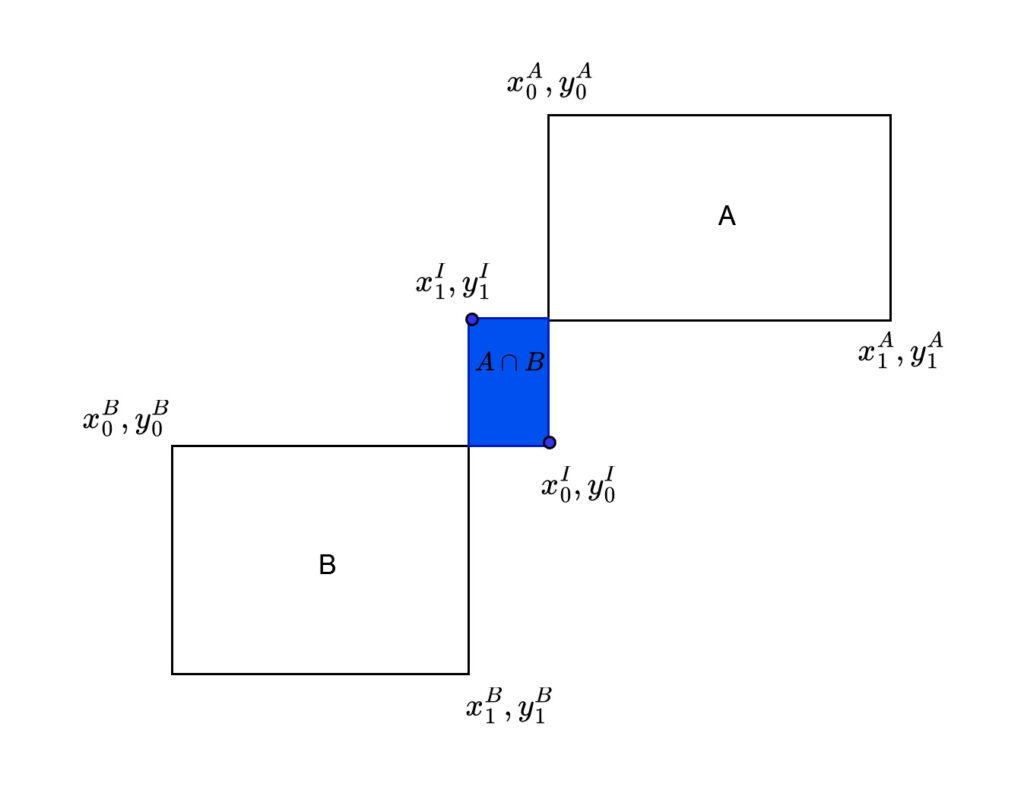
From the figure above, we can see that  and
and  . In this case, the calculation of the width and height of the intersection box (false intersection box) results in negative values.
(7) 
Thus, the first conclusion is that negative values for both the width and height of the intersection box indicate that there is no intersection between the two boxes.
Now, let’s look at the second case.
Second Case
Another case is depicted in the following figure:
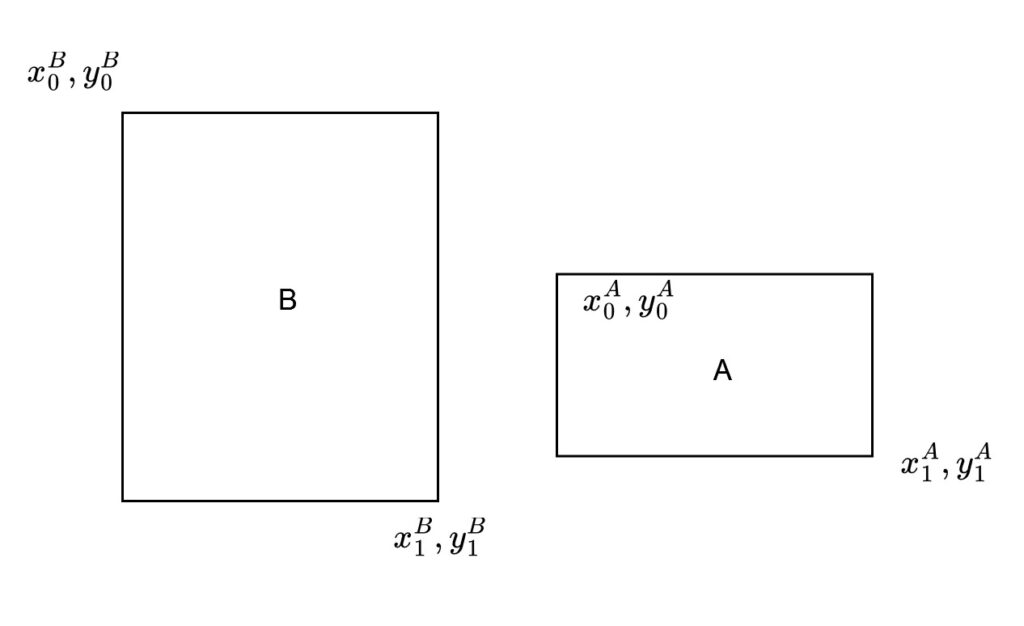
In this case, we also have two none overlap bounding boxes. So, if we do the same process as in the first case, we have:
- = (, ) =
- = (, ) =

- = (, ) =
- = (, ) =
Let’s draw a false bounding box covered by these two opposite corners, as in the figure below.
In this case, the calculation for the width and height of the intersection area are:
(8) 
In this case, only the width is negative. However, even if only the width is negative, it still indicates the absence of an intersection between these two boxes.
Thus, the second conclusion is that if either the width or height of the intersection box is negative, or if both are negative, there is no intersection between the two boxes.
So, when we implement IoU in the code, we need to handle these conditions by simply checking the sign of the width and height of the intersection area candidate. If either one or both are negative, simply change to 0.
Ok, that’s it for the theory of Intersection over Union (IoU). Next, we’ll demonstate what we’ve learned by implementing it in Python using Pytorch library.
Let’s start now!
Python Implementation
IMPORTANT!
We’re going to implement the IoU using a Google Colab notebook. I hope you guys are already familiar with it.
We start first by importing the requirement libraries as follows:
import random
import torch
from PIL import Image
import matplotlib.pyplot as plt
import numpy as np
Please copy and paste it into a new cell in your Colab notebook, and run it.
Generating Random Bounding Boxes
Now, we will create a function that can generate random bounding boxes. Please add a new cell in your Colab notebook then copy and paste this code into it. Then, execute it.
def GenerateBoxes(n=2):
    boxes = []
    for i in range(n):
        x1 = random.randint(30, 60)
        y1 = random.randint(30, 60)
        w = random.randint(20, 40)
        h = random.randint(20, 40)
        x2 = x1 + w
        y2 = y1 + h
        boxes.append(torch.tensor([x1, y1, x2, y2]))
    return boxes
In the code above, we simply create a simple function called GenerateBoxes() to generate random bounding boxes. What I mean by random is random in position and size. However, we limit the their widths and heights from 20 up to 40 pixels, and their top-left corners vary from pixels position 30 to 60 for both  and
and  .
.
This function takes in  as input, which is the number of bounding boxes to generate, and returns two boxes in the tensor format.
we can call this function like in the following code to generate two bounding boxes. Please copy and paste it into a new cell in your Colab notebook.
boxes = GenerateBoxes(2)
boxA, boxB =boxes
print(boxA)
print(boxB)
If you run this code, you will get a similar result to this, but with different values because they are generated randomly.

Creating calculate_iou() Function
Well! Now, we’re gonna create a function for IoU calculation. Simply copy and paste the code below into a new cell in your Colab notebook and run it.
def calculate_iou(boxA, boxB):
    #Extract bounding boxes coordinates
    x0_A, y0_A, x1_A, y1_A = boxA
    x0_B, y0_B, x1_B, y1_B = boxB

    # Get the coordinates of the intersection rectangle
    x0_I = max(x0_A, x0_B)
    y0_I = max(y0_A, y0_B)
    x1_I = min(x1_A, x1_B)
    y1_I = min(y1_A, y1_B)

    #Calculate width and height of the intersection area.
    width_I = x1_I - x0_I
    height_I = y1_I - y0_I

    # Handle the negative value width or height of the intersection area
    #if width_I<0 : width_I=0
    #if height_I<0 : height_I=0
    width_I = torch.clamp(width_I, min=0)
    height_I = torch.clamp(height_I, min=0)

    # Calculate the intersection area:
    intersection = width_I * height_I

    # Calculate the union area:
    width_A, height_A = x1_A - x0_A, y1_A - y0_A
    width_B, height_B = x1_B - x0_B, y1_B - y0_B
    union = (width_A * height_A) + (width_B * height_B) - intersection

    # Calculate the IoU:
    IoU = intersection/union

    # for plotting purpose
    boxI = torch.tensor([x0_I, y0_I, width_I,height_I])

    # Return the IoU and intersection box
    return IoU, boxI
I named the function as calculate_iou(). I created this function with a step-by-step approach in order to facilitate you to better understand of the whole process.
This function takes in two inputs, boxA and boxB, which are two bounding boxes in the format: [x0,y0,x1,y1] and returns the IoU score, IoU and the intersection area, boxI.
Line 3 - 4: extract the bounding boxes coordinates.
Lines 7 - 10: get the coordinates of the intersection area.
Lines 13 - 14: calculate the width and height of the intersection bounding box.
Lines 19 - 20: handle the none overlaping bounding boxes. If the width or height of the intersection area has the negative value, simply change it to  . The
. The torch.clamp() function is used to set negative numbers to (min=0). Alternatively, lines 17 - 18 serve the same purpose.
Line 23: calculate the intersection area.
Lines 26 - 28: calculate the union area.
Line 31: calculate the IoU.
Line 34: create a tensor of the intersection box in the format: [x0, y0, width, height] to be returned for plotting purpose.
Line 37: return the IoU (IoU) and intersection box (boxI).
Testing Code
Finally, we can now examine the IoU calculation. Simply copy, paste into a new cell in your Colab notebook, and run it.
# Create a white image
img = Image.new('RGB', (100, 100), color = (255, 248, 220))
# Convert image to numpy array
img_array = np.array(img)
# Create figure and axes
fig, ax = plt.subplots()
# draw the image in current figure
plt.imshow(img_array)

# Create bounding boxes
boxes = GenerateBoxes(2)
boxA, boxB =boxes

#Extract bounding boxes coordinate:
x0_A, y0_A, x1_A, y1_A = boxA
x0_B, y0_B, x1_B, y1_B = boxB

# Draw Rectangle format: Rectangle((x0, y0), width, height, fill=False, color='r')
width_A, height_A = x1_A - x0_A, y1_A - y0_A
ax.add_patch(plt.Rectangle((x0_A, y0_A), width_A, height_A, fill=False, color='r'))
width_B, height_B = x1_B - x0_B, y1_B - y0_B
ax.add_patch(plt.Rectangle((x0_B, y0_B), width_B, height_B, fill=False, color='g'))

# Call calc_IoU() function
IoU, boxI = calculate_iou(boxA,boxB)
x0_I, y0_I, width_I, height_I = boxI

print("IoU = ", np.array(IoU))

# Draw the intersection area:
ax.add_patch(plt.Rectangle((x0_I, y0_I), width_I, height_I, fill=True, color='b'))

plt.show()
Lines 2 - 8: create an RGB image of shape (100,100,3) and draw it on the current figure.
Lines 11 - 12: call the GenerateBoxes() function to generate two bounding boxes, boxA and boxB. The argument “2” indicates 2 boxes to generate.
Lines 15 - 16: extract the coordinates of bounding boxes (line 15 for boxA and line16 for boxB)
Line 19 - 20: draw the bounding boxes boxA and boxB on the figure.
Line 25: call the calculate_iou() function using boxA and boxB as arguments and get the IoU, boxI as the returning values.Line 26: extract the bounding box information, [x0, y0, width, height], from the intersection box, boxI that we just get from calculate_iou() function.
Line 28: print the IoU score obtained from the calculation of the calculate_iou() function.
Line 31: draw the intersection bounding box on the figure.
Line 33: show the figure.
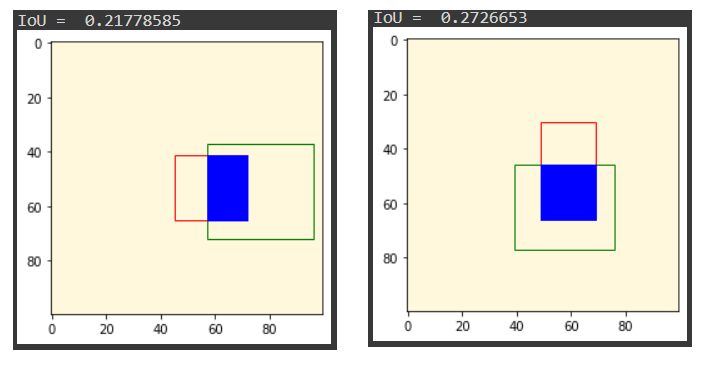
You can run the code multiple times to observe the different IoU scores for the two bounding boxes. I have two examples available here:
Ok, that’s it for this tutorial. Hope you’re enjoy it!
Conclusion
To sum up, a thorough understanding of Intersection over Union (IoU) and the ability to implement it in your computer vision projects can greatly deepen your comprehension of object detection algorithms. This is because IoU is one of key metrics used to evaluate the performance of object detection models. This tutorial has provided a comprehensive guide on the concept of IoU, its derivation, and implementation in Python and Pytorch library. I hope this tutorial is beneficia in expanding your machine learning skills and increasing your knowledge of object detection. Don’t forget to share it and I’ll see you in the next tutorial!
Recently Posted Tutorials
- COCO Dataset: A Step-by-Step Guide to Loading and Visualizing with Custom Code
- A Comprehensive Guide to Gradient Descent Algorithm
- How to Create a Custom Dataset Class in PyTorch