How to Create a Custom Dataset Class in PyTorch
In this tutorial, we will learn how to create a custom dataset class by inheriting from the Pytorch abstract class torch.utils.data.Dataset. We will use the MNIST handwritten dataset as an example to demonstrate how to build and use a custom dataset class in Pytorch.
The MNIST dataset is a widely used dataset for handwriting recognition and is a great dataset to use as an example for creating a custom dataset in Pytorch. We will go through the process of downloading the dataset from the official MNIST link, creating the dataset class, loading and visualizing the data.
Upon completion of this tutorial, you will be able to:
- Download MNIST dataset directly from the official MNIST link in Python
- Create your own custom Dataset class
- Load and visualize the dataset.
Here is the outline that we will be covering today:
- Introduction
- Downloading MNIST Dataset
- Creating Custom Dataset Class
- Loading and Visualizing the dataset
- Conclusion
Introduction
Datasets are critical to the success of machine learning projects, as we absolutely need them to train, test, and evaluate our models. Understanding on how to load dataset efficiently is extremly important in developing machine learning projects. Efficiently loading datasets can help improve the overall performance and speed of the machine learning process, leading to more efficient resource utilization and faster training of models.
To this end, PyTorch offers a variety of built-in datasets for various machine learning applications and provides data loading API which supports for loading custom user datasets containing data in many forms.
There are several usefull built-in classes in Pytorch that we can use to load and manipulate the datasets. However, if we have a specific requirement for example to preprocess and return the data in a certain way, we can create our own dataset class by inheriting from the built-in Pytorch’s Dataset class.
By having our own custom dataset class, it allows us to have more control over how the data is loaded, processed, and returned to the model for training and evaluation. Therefore, in this tutorial we will discuss how to create our custom dataset class clearly.
So, let’s start our tutorial by creating a function to download MNIST dataset.
Downloading MNIST Dataset
MNIST handwritten dataset consists of 60,000 training examples and 10,000 test examples. The images in the dataset are 28×28 pixels in size and are grayscale, with pixel values ranging from 0 to 255. This dataset is publicly accessible on the link: http://yann.lecun.com/exdb/mnist/. So, in this section we’re gonna create a function that allows us to download the dataset directly from the link.
Let’s do it!
The following code is the function that we will use to download the MNIST dataset. This function receives two parameters, the url and file_dict. Simply copy and paste it into your new Colab notebook cell and run it.
from tqdm import tqdm
import requests
import gzip
import os
import numpy as np

def download_mnist(url,file_dict=None):
    if file_dict is not None:
        mnist_data=list()
        try:
            for i, key in enumerate(file_dict.keys()):
                fname = file_dict[key]
                url = os.path.join(url_root,fname)

                isExist = os.path.exists(fname)
                if not isExist:
                    response = requests.get(url, stream=True)
                    fsize=len(response.content)
                    print(url)
                    with open(fname, 'wb') as fout:
                        for data in tqdm(response.iter_content(), desc =fname, total=fsize):
                            fout.write(data)

                with gzip.open(fname, "rb") as f_in:
                    if fname.find('idx3') != -1:
                        mnist_data.append(np.frombuffer(f_in.read(), np.uint8, offset=16).reshape(-1, 28, 28)) #if images
                    else:
                        mnist_data.append(np.frombuffer(f_in.read(), np.uint8, offset=8))  #if labels
            #return mnist_data in a list format ==> [[train_images], [train_labels], [test_images], [test_labels]]
            return mnist_data
        except Exception as e:
            print("Something went wrong:", e)
    else:
        print("file_dict cannot be None")
In line 9, we prepare a list variable mnist_data to store dataset partitions after being decoded. Actually, MNIST handwritten has four different dataset partitions and they are stored in four different files. Here is a screen shot that I took from the official website of MNIST handwritten dataset. The MNIST dataset actually has four different files as you can see in the figure below.
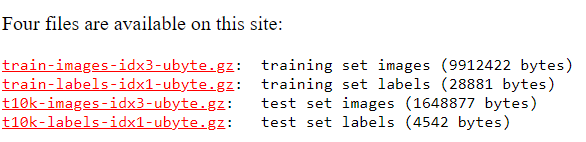
The first two files, train-images-idx3-ubyte.gz (images) and train-labels-idx1-ubyte.gz (labels), are the files containing training dataset.
The last two files, t10k-images-idx3-ubyte.gz (images) and t10k-labels-idx1-ubyte.gz (labels), are the files containing testing dataset.
In line 12: get the file name based on the given key. You can refer to the subsection Call download_mnist() Function to know how I create the file_dict.
In line 13: join url and filename.
In line 15: check if the file is already exist or not. If it does, skip downloading it again.
In line 17: we use the requests.get() method to send an HTTP GET request to the provided URL, and with stream=True we tell the server that we want to receive the response in chunks, rather than all at once.
In line 21-22: we loop over the chunks of data received in the response, and we write them to the file. The tqdm() function is used to show a progress bar for the download process.
In lines 24-28: the file is in .gz format, so we use gzip to extract it. Then we read the file using the np.frombuffer, and append it to the list mnist_data.
To make you better understand the code lines 24-28, I provide the following figure that describes how these files are encoded. The files containing images are encoded in a different way than those containing labels as you can see in the figure below.
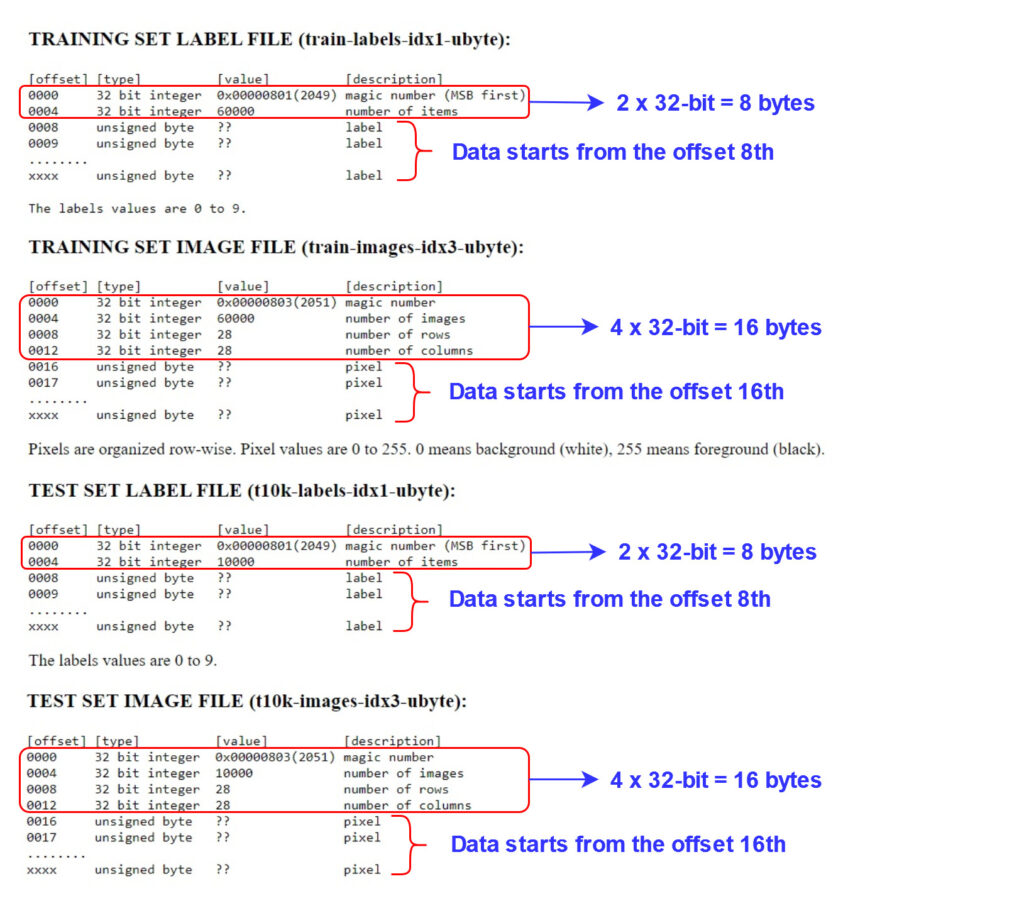
So, In lines 25-28, we differentiate between file containing images and file containing labels by checking for the presence of the substring “idx3” in the filename. If the filename contains the substring “idx3“, it indicates that this file contains images. In this case, we start reading the file from the 16th offset and reshape it to the form (-1, 28*28). On the other hand, if the filename does not contain “idx3“, it means that the file contains labels and we start reading the file from the 8th offset and no need to be reshaped.
In line 30, we return the list of the dataset mnist_data, which contains four different partitions of data in the following order: [train images, train labels, test images, test labels].
Call download_mnist() Function
Now, we can call the function download_mnist() to download the MNIST data. Since this function receives two parameters, the url and file_dict, we need to define these parameters first before calling the function.
Here is the root url that we’re gonna use: http://yann.lecun.com/exdb/mnist/.
We define the file_dict as follows:
file_dict={
'train_images':'train-images-idx3-ubyte.gz',
'train_labels':'train-labels-idx1-ubyte.gz',
'test_images':'t10k-images-idx3-ubyte.gz',
'test_labels':'t10k-labels-idx1-ubyte.gz'
}
Simply copy and paste this code to a new Colab notebook cell.
url_root = 'http://yann.lecun.com/exdb/mnist'
file_dict={
'train_images':'train-images-idx3-ubyte.gz',
'train_labels':'train-labels-idx1-ubyte.gz',
'test_images':'t10k-images-idx3-ubyte.gz',
'test_labels':'t10k-labels-idx1-ubyte.gz'
}
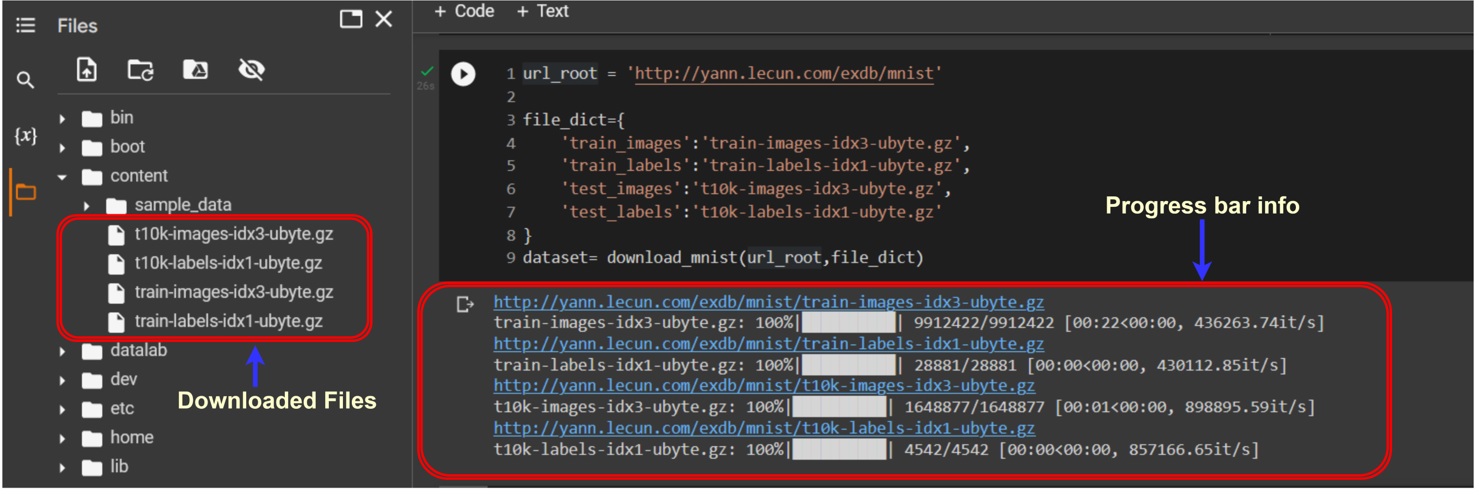
dataset= download_mnist(url_root,file_dict)
When you run this code, the progress of files downloading will be displayed in the output. Once all the downloads are complete, you can check the folder content and you will find that four new files have been added as shown in the figure below. These files constitute the MNIST dataset that we have just downloaded.
The variable “dataset” holds a list of four partitions of dataset, presented in the following order: training images, training labels, test images, and test labels. So, let’s split them all. Copy and paste the following code to a new Colab cell and execute it.
train_images=dataset[0]
train_labels=dataset[1]
test_images=dataset[2]
test_labels=dataset[3]

print(f"train_images_shape: {train_images.shape}")
print(f"train_labels_shape: {train_labels.shape}")
print(f"test_images_shape: {test_images.shape}")
print(f"test_labels_shape: {test_labels.shape}")
After you run the code above, you will have the output as follows:
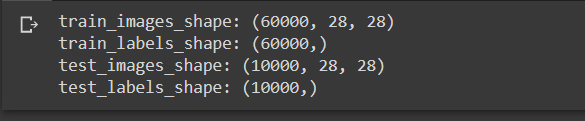
As you can see, we have succesfully downloaded and loaded the MNIST dataset onto our computer. So, what we’re gonna do next is to create a custom dataset class to properly load the dataset so that it can be used for training and validating our machine learning model.
Creating Custom Dataset Class
Defining Transforms
Before we create our Custom dataset class, we firstly need to define data transformations for our dataset. Transforming a dataset is commonly used in deep learning to prepare the data for training. It is a preprocessing step to make sure that the data is in the right format and that it has the right characteristics to be effectively used for training and evaluating the model.
For the MNIST handwritten dataset, we’ll use only two transformations provided by Pytorch from the module torchvision.transforms, which are ToTensor() and Normalize().
ToTensor() is used to convert images to tensors so that they can be passed to a convolutional neural network.
Normalize() is used to scale the values to a similar range, which can improve the convergence rate and stability of the model during training.
You can check the other transfoms in PyTorch official documentation.
To create a transformation pipeline, transforms operations can be chained together using the Compose class as the following code. Simply copy and paste it into a new Colab notebook cell and execute it.
from torchvision import transforms
data_transform = transforms.Compose(
    [
        transforms.ToTensor(),
        transforms.Normalize(mean = (0.1307,), std = (0.3081,))
    ]
)
Great! We have defined the transforms for the dataset. Ok now, we can start creating our custom Dataset class.
Defining Custom Dataset Class
To create a custom Dataset class, we need to inherit our class from the class torch.utils.data.Dataset. The torch.utils.data.Dataset is a built-in Pytorch abstract class for representing a dataset in Pytorch.
What we need to do is to overwrite the following two methods as they are defined as the basic interface of a dataset.
__len__(self): This method should return the size of the dataset that can be used by the DataLoader to determine how many iterations needed to load the entire dataset.__getitem__(self, index): This method should return a single sample based on the given index. It is used by the DataLoader to retrieve a single batch of data for each iteration.
Here is our custom Dataset class. I call it as MNISTCustomDataset() class because we specifically designed this class for the MNIST handwritten dataset. Nevertheles, you are free to name it as you want. What you need to do is simply copy and paste it into a new Colab notebook cell and don’t forget to execute it.
from torch.utils.data import Dataset

class MNISTCustomDataset(Dataset):
    def __init__(self, images, labels, transform=None):
        self.images = images
        self.labels = labels
        self.transform = transform

    def __getitem__(self, idx):
        label = self.labels[idx]
        image = self.images[idx]
        image = self.transform(np.array(image))
        return image, label

    def __len__(self):
        return len(self.labels)
In __init__() function, we define three variables, self.images, self.labels, and self.transform, that we receive from the passing arguments, images, labels, transforms. So when we create an instance of this class, we need to provide our source of images and labels, and the transforms.
In __getitem__() function, we retrive a single the dataset sample, image and label, based on the given index. After that we do the transformation. Then, we return this sample as image and label.
In _len__() function, we return the total number of samples of the dataset.
Ok, that’s it for our custom dataset set. It’s easy, right?
Next, I will show you how to effectively load and visualize our dataset using the custom Dataset class and Pytorch Dataloader.
Loading and Visualizing Dataset
To load and visualize our dataset, we will start by creating a Dataset class instance and then we use Pytorch Dataloader to return an iterator over the dataset. Then the iterator can be used to iterate through the dataset in batches.
Create Instance of Custom Dataset class
Now we’re going to create an instance of the MNISTCustomDataset() class. We pass in three arguments, train_images and train_labels that we have obtained, and transforms that we already defined earlier.
Here is the code that you can copy and paste into a new Colab notebook cell and execute it to create this instance. What I’m doing here is I just to create an instance for the training dataset, you can do by yourself for the testing dataset using the same way.
train_dataset = MNISTCustomDataset(train_images, train_labels,transform=data_transform)
Using Dataloader for Custom Dataset Class
The Pytorch DataLoader is a PyTorch utility class that simplifies loading datasets into the model by offering batching, shuffling, and multi-threaded parallel loading. It also provides data augmentation, padding, and tensor conversion capabilities. It will return an iterator over the dataset, so that we can use it to iterate through the dataset in batches. It provides several benefits when loading datasets, as it can handle batching, shuffling, multi-threading, and caching of data automatically. You can learn more about Pytorch’s DataLoader from the PyTorch official documentation.
The following is the code for using Dataloader. As usual, you can copy and paste it in your new Colab notebook cell and execute it.
from torch.utils.data import DataLoader
train_dataloader = DataLoader(train_dataset, batch_size=16, shuffle=True)
In this example, we create a DataLoader instance to handle batching and shuffling of our train_dataset. To use the Dataloader, we need to import it first from torch.utils.data, as we do in line 1. As you can see, when we create the DataLoader instance, we pass in three arguments: train_dataset (an instance of MNISTCustomDataset() that we’ve just created), batch_size=16, and the suffle=True, which means that we want to suffle the dataset.
I will let you do the same thing for loading the test_dataset. The process is exactly the same as loading the train_dataset. So, I’m pretty sure you can do it by yourself.
Ok. Next, we will visualize the dataset. Let’s do it!
Visualizing Dataset
Finally, we can now visualize our dataset. The following code is the function that we can use to visualize our dataset. Simply copy and paste into your Colab notebook cell and execute it. In this code we just pass in some particular images and labels that we’ve loaded from our dataset and we can plot it using matplotlib.pyplot.
import matplotlib.pyplot as plt
def plot_examples(images, labels, rows=1):   #by default set rows=1
    fig = plt.figure()
    columns = len(images) // (rows)
    for i, (img, lbl) in enumerate(zip(images, labels)):
        if i < columns*rows:
            ax = fig.add_subplot(rows, columns, i+1)
            ax.imshow(img.reshape(28, 28),cmap="gray")
            ax.set_xticks([]) #set empty label for x axis
            ax.set_yticks([]) #set empty label for y axis
            ax.set_title("label: {}".format(lbl.item()))
    plt.tight_layout()
    return fig
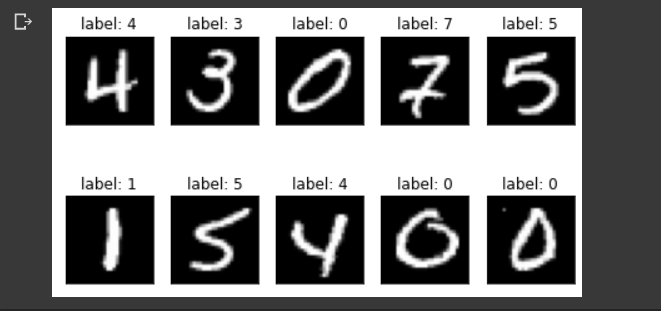
Now we take the first batch of the train dataset, and we plot the first 10 samples. Copy and paste the code below to your new Collab notebook cell and execute it.
examples = enumerate(train_dataloader)
batch_idx, (images, labels) = next(examples)
images_=images[0:10]
labels_=labels[0:10]
plot_examples(images_, labels_, rows=2);
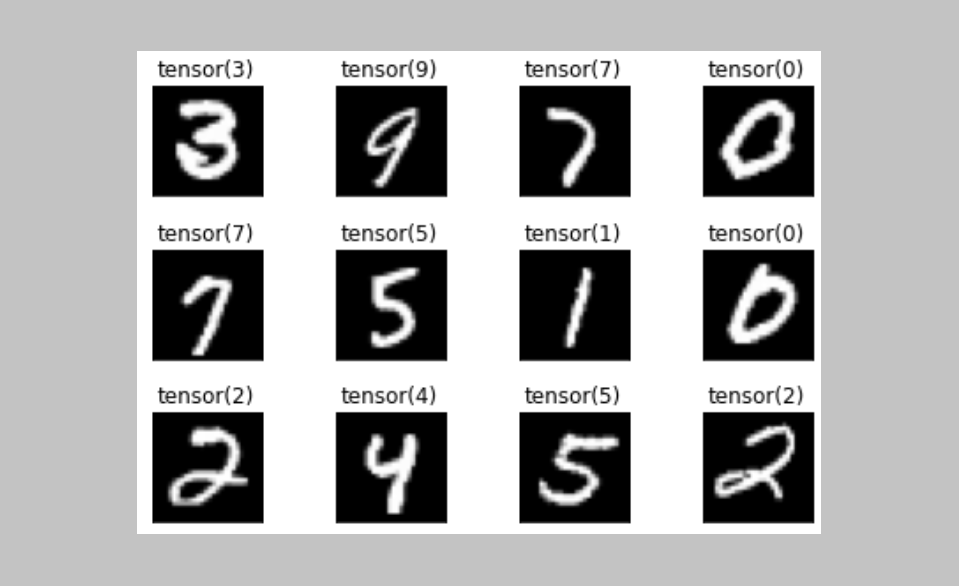
And finally we can visualize our dataset, as you can see in the figure below. You may have different figure, because we shuffled the dataset when we loaded it.
Ok, Great. That’s it for today’s tutorial.
Conclusion
In this article, we have discovered the process of creating a custom Dataset class and using it to load our dataset. We walked through the main steps, including downloading the dataset, creating a custom Dataset class by inheriting from Pytorch’s abstract Dataset class (torch.utils.data.Dataset
See you in the next tutorial.
I love sharing what I’ve learned to people. However, I cannot claim what I share is 100% accurate. If you know about something we missed or found something that is incorrect, please let me know by leaving your comments. That will improve my knowledge and help the community. Big thanks!.
Recently Posted Tutorial
- COCO Dataset: A Step-by-step Guide to Loading and Visualizing with Custom Code
- A Comprehensive Guide to Gradient Descent Algorithm
- Intersection over Union (IoU): A comprehensive guide