Sentiment Analysis Using Keras Embedding Layer in TensorFlow 2.0
Learn How to Solve Sentiment Analysis Problem With Keras Embedding Layer and Tensorflow

Introduction
Text classification, one of the fundamental tasks in Natural Language Processing, is a process of assigning predefined categories data to textual documents such as reviews, articles, tweets, blogs, etc.
One of the special cases of text classification is sentiment analysis.
The sentiment analysis is a process of gaining an understanding of the people’s or consumers’ emotions or opinions about a product, service, person, or idea. By understanding consumers’ opinions, producers can enhance the quality of their products or services to meet the needs of their customers.
Sentiment can be classified into binary classification (positive or negative), and multi-class classification (3 or more classes, e.g., negative, neutral and positive).
In this tutorial, we are going to learn how to perform a simple sentiment analysis using TensorFlow by leveraging Keras Embedding layer. For the purpose of this tutorial, we’re going to use a case of Amazon’s reviews.
This is the list what we are going to do in this tutorial:
- Load the Amazon reviews data, then take randomly 20% of the data as our dataset. From this 20%, we’ll be dividing it again randomly to training data (70%) and validation data ( 30%).
- Perform preprocessing including removing punctuation, numbers, and single characters; and converting the upper cases to the lower cases, so that the model can learn it easily.
- Convert all text in corpus into sequences of words by using the Keras Tokenizer API.
- Create and train a Deep Learning model to classify the sentiments using Keras Embedding layer.
- Validate the model.
Here is a straightforward guide to implementing it. Let’s get started!.
Data preparation
Step1: Download the amazon reviews data from Kaggle
For the purpose of this tutorial, we’re going to use the Kaggle’s dataset of amazon reviews that can be downloaded from this link. If you want to work with google collab you can upload this dataset to your Google drive.
First of all, verify the installed TensorFlow 2.x in your colab notebook. If it exists, select it, otherwise upgrade TensorFlow.
try:
    %tensorflow_version 2.x
except:
    !pip install --upgrade tensorflow
Then, mount your Google drive with the following code:
from google.colab import drive
drive.mount('/content/drive')
Run the code and your output will be something like this:
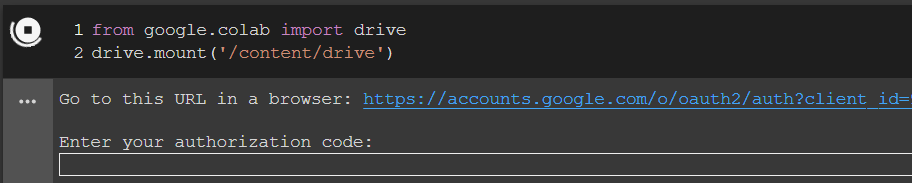
Click on the link provided as shown in the figure above, then authorize the connection, you will be given a code, copy and paste it to the box “Enter your authorization code:“, then press Enter. Now, you are normally in the Google drive directory.
Here is my Google drive, (just for example). I uploaded the file amazonreviews.zip to the NLP folder in my Google drive.
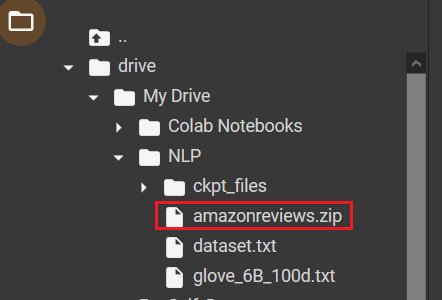
Point to the path where your amazonreviews.zip file is located. Mine is like in the following:
%cd drive/My\ Drive/NLP
Unzip the amazonreviews.zip file and decompress it.
!unzip amazonreviews.zip
The amazonreviews.zip file contains two compressed files, train.ft.txt.bz2 and test.ft.txt.bz2.
In this tutorial, we’re going to use only the train.ft.txt.bz2 file. So just decompress this file using the following command, then you will have a .txt file, that istrain.ft.txt.
!bzip2 -d train.ft.txt.bz2
Now, we’re going to open the train.ft.txt file. To do so, use the following code:
with open('train.ft.txt', 'r') as file:
    lines = file.readlines()
First, let’s take a look at the contents of the train.ft.txt file.
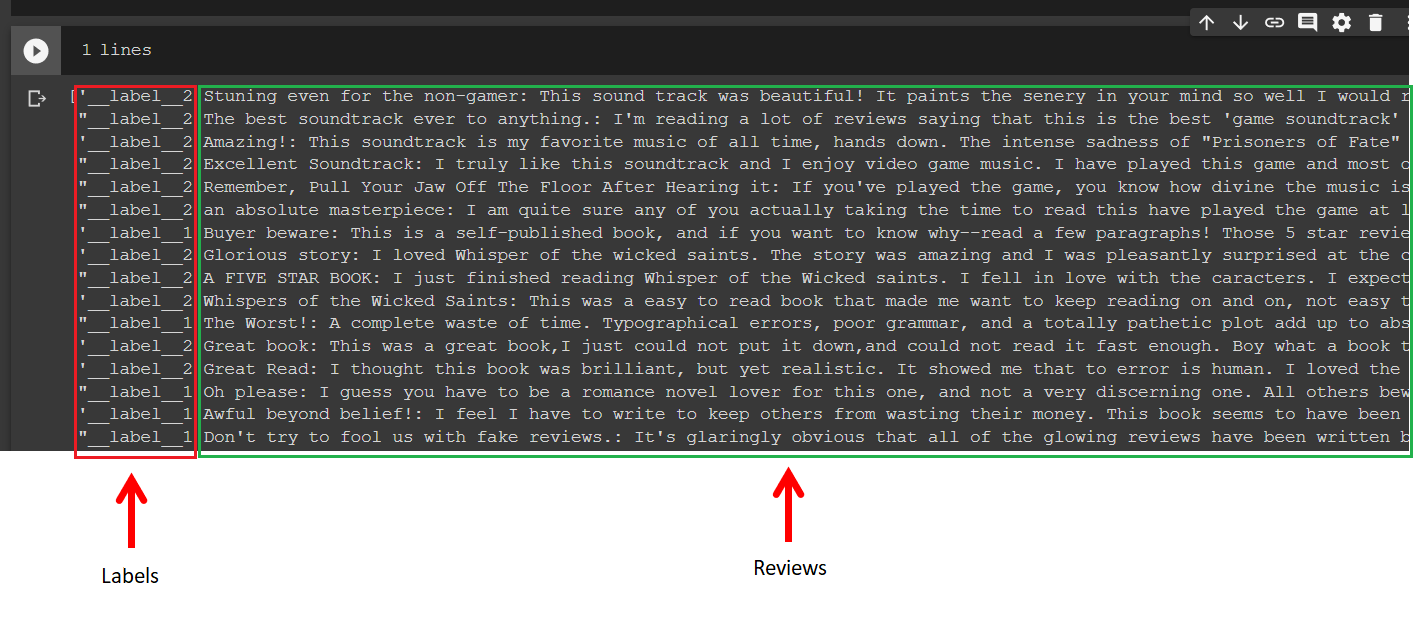
As you can observe from the above figure, the beginnings of the lines are the labels followed by the reviews. The file contains only two review labels, _label__2 and __label_1 for the positive and negative, respectively.
So far, we’re doing good. Let’s go ahead.
Step2: Data Preprocessing
Since our data source is data with .txt format, I prefer to convert it to a Pandas’ data frame. So, the first step of this data preparation is to convert the .txt data to the Pandas’ data frame format.
Converting Data to Pandas Data Frame
To do so, I will start it by importing Pandas and creating a Pandas’ data frame DF_text_data as follows:
# create a dataframe
import pandas as pd
DF_text_data = pd.DataFrame()
Now, we’re going to loop over the lines using the variable line. Then, we’ll separate the labels and the reviews from the line and store them to the Pandas’ data frame DF_text_data with different columns.
Anytime we loop over the lines, we convert text labels to numerical labels. Since this review is a binary case problem, i.e., negative and positive reviews, so we can easily convert these labels by replacing all the labels __label__2 to 1s and all the labels __label__1 to 0s.
Here is the code for doing this:
texts=[]
labels=[]
for line in lines:
    line=line.split()
    labels.append(1) if line[0] =="__label__2" else labels.append(0)
    texts.append(" ".join(line[1:]))

DF_text_data['reviews'] = texts
DF_text_data['labels'] = labels
If we print DF_text_data, you will see something like in the following figure. The data consists of 3 columns, they are indexes, reviews and labels.
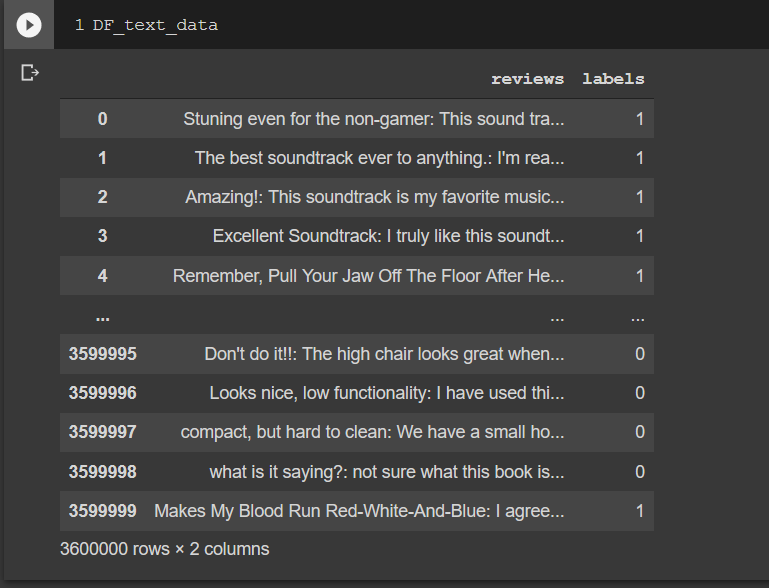
As you can see, the index is started from 0 to 3.599.999, meaning this dataset contains 3.6M reviews and labels. This is a big dataset, by the way. If you have a good computer resource, you could just use them all, otherwise, we’ll be using a small part of it, let’s say 2 percent of it. To do so, check this code:
from sklearn import model_selection

_, X_data,_, y_data = \
    model_selection.train_test_split(DF_text_data['reviews'],
                                     DF_text_data['labels'], test_size=0.02)
The X_data now only contains 72K reviews and labels.
Data cleaning
Before we can go deeper into analyzing, we need to do data cleaning, including removing punctuation, numbers, and single characters; and converting the upper cases to the lower cases, so that the model can learn the data easily.
The following is the function for this purpose:
def preprocess(in_text):
    # If we have html tags, remove them by this way:
    #out_text = remove_tags(in_text)

    # Remove punctuations and numbers
    out_text = re.sub('[^a-zA-Z]', ' ', in_text)
    # Convert upper case to lower case
    out_text="".join(list(map(lambda x:x.lower(),out_text)))
    # Remove single character
    out_text = re.sub(r"\s+[a-zA-Z]\s+", ' ', out_text)
    return out_text
Now, perform the preprocessing by calling the preprocess function.
#Performing preprocessing
import re

text_data=[]
for review in list(X_data):
    text_data.append(preprocess(review))
Create a new data frame to store a small part of the data that has been performed preprocessing.
DF_text= pd.DataFrame()
DF_text['reviews'] = text_data
DF_text['labels'] = list(y_data)
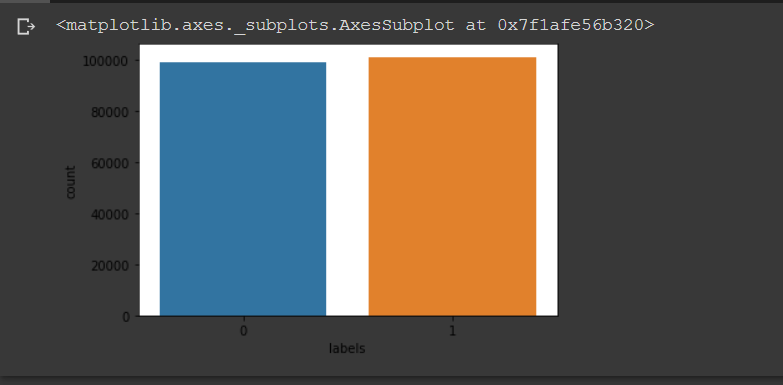
Now, we plot the data distribution for both classes. From the plot figure, we can see that the distribution of the data is almost the same portion for both negative and positive sentiments.
#Plot data distribution
import seaborn as sns
sns.countplot(x='labels', data=DF_text)

"""
If you use Anaconda with PyCharm uncomment these lines to show the figure.
"""
#import matplot.pyplot as as plt
#plt.show()
Now we’re going to divide our dataset into 70% as training and 30% as testing data.
X_train, X_test, y_train, y_test = \
    model_selection.train_test_split(DF_text['reviews'],
                                     DF_text['labels'], test_size=0.30)
Convert them to the list array.
import numpy as np
X_train=np.array(X_train.values.tolist())
X_test=np.array(X_test.values.tolist())
y_train=np.array(y_train.values.tolist())
y_test=np.array(y_test.values.tolist())
Word Embeddings
In order to train our data, Deep learning model requires the numerical data as its input. Since we’re working on text classification, we need to translate our text data into numerical vectors. To do so, we’re going to use a method called word embeddings. This method encodes every word into an n-dimensional dense vector in which similar words will have similar encoding.
For this purpose, we’re going to use a Keras Embedding layer. Embedding layer can be used to learn both custom word embeddings and predefined word embeddings like GloVe and Word2Vec.
In this NLP tutorial, we’re going to use a Keras embedding layer to train our own custom word embedding model. The layer is initialized with random weights and is defined as the first hidden layer of a network.
The Embedding layer has 3 important arguments:
- input_dim: Size of the vocabulary in the text data.
- output_dim: Size of the vector space in which words will be embedded. This is a parameter that can be experimented for having a better performance. (ex: 32, 100, …)
- input_length: Length of input sequences
Tokenizer
Before the data text can be fed to the Keras embedding layer, it must be encoded first, so that each word can be represented by a unique integer as required by the Embedding layer. To do this, Keras also provides a Tokenizer API that allows us to vectorize a text corpus into a sequence of integers.
The following is the code to do the tokenization. First, we create a Keras tokenizer object. Then, with this object, we can call the fit_on_texts function to fit the Keras tokenizer to the dataset.
from keras_preprocessing.text import Tokenizer

tokenizer = Tokenizer()
tokenizer.fit_on_texts(X_train)
word_index=tokenizer.word_index
vocab_size = len(word_index)+1
print(vocab_size)
After fitting the tokenizer to the dataset, now we’re ready to convert our text to sequences by passing our data text to texts_to_sequences function.
This function tokenizes the input corpus into tokens of words where each of the word token is associated with a unique integer value.
We do it for both training and testing data.
X_train = tokenizer.texts_to_sequences(X_train)
X_test = tokenizer.texts_to_sequences(X_test)
Finally, we add padding to make all the vectors to have the same length maxlen.
from tensorflow.keras.preprocessing.sequence import pad_sequences
from tensorflow.keras.utils import to_categorical

maxlen = 100

X_train_pad = pad_sequences(X_train, padding='post', maxlen=maxlen)
X_test_pad = pad_sequences(X_test, padding='post', maxlen=maxlen)
Now, the data is ready to be feed to the model.
Create a Model
We are now ready to create the NN model. For this tutorial, we use a simple network, you can try to use a deeper network, or with different configuration such as using LSTM layer, and perform a comparison.
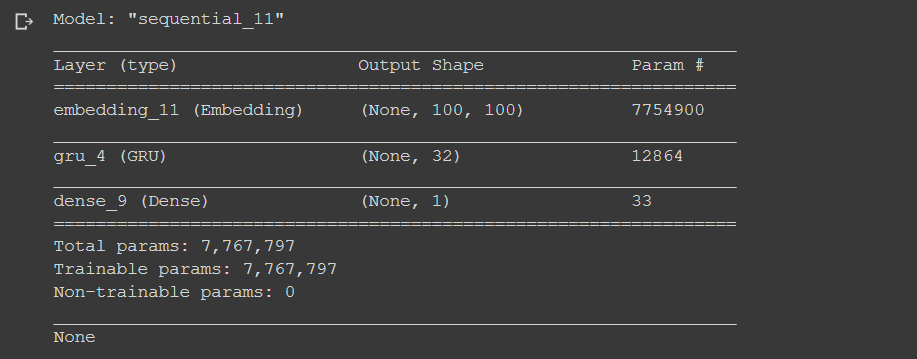
We create a sequential model with the embedding layer is the first layer, then followed by a GRU layer with dropout=0.2 and recurrent_dropout=0.2. and the last layer is a dense layer with the sigmoid activation function. We use sigmoid because we only have one output.
from tensorflow.keras.layers import Flatten, GRU, Dense, Flatten, Embedding
from tensorflow.keras.models import Sequential

model = Sequential()
model.add(Embedding(vocab_size, 20, input_length=maxlen))
model.add(GRU(units=32,dropout=0.2, recurrent_dropout=0.2))
model.add(Dense(1, activation='sigmoid'))
Compile the Model
To compile the model, we use Adam optimizer with binary_crossentropy.
model.compile(optimizer='adam', loss='binary_crossentropy', metrics=['acc'])
print(model.summary())
Train the Model
Now, it’s time to train the model.
This code below is used to train the model. We validate the model while training process.
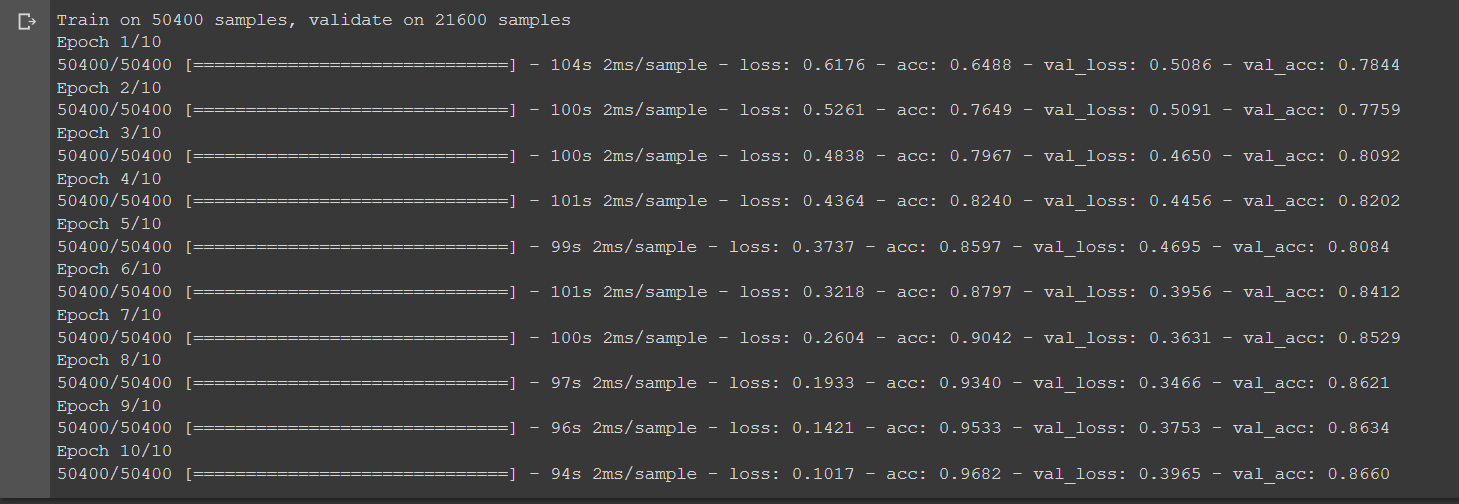
model.fit(X_train_pad, y_train, batch_size=128, epochs=10, verbose=1, validation_data=(X_test_pad, y_test))
After 10 epochs, the model achieves 86.66% of accuracy after epoch 10. Not bad.
Conclusion
In this article, we’ve built a simple model of sentiment analysis using custom word embeddings by leveraging the Keras API in TensorFlow 2.0.
Here are some remarks:
- To do text classification, we need to do some data preprocessing, including removing punctuation, numbers, and single character and converting upper cases to lower cases, so that the computer can easily understand and enhance the accuracy rate.
- A Deep learning model requires numerical data as its input. Therefore we need to convert our text data into numerical vectors. To do so, we use the word embeddings method.
- Word embeddings are a way of representing words that can encode corpus text into numerical vector spaces in which similar words will have similar encoding.
- It is considered the best available representation of words in NLP.
Next…
To explore further, in the next tutorial, we’re going to use two popular pre-trained word embeddings, GloVe and Word2Vec. So, see you in the next tutorial.
What others say
Great write up!
Very simple, clear explanations. Thank you.