The beginner’s guide to implementing YOLOv3 in TensorFlow 2.0 (part-4)
In part 3, we’ve created a python code to convert the file yolov3.weights into the TensorFlow 2.0 weights format. Now, we’re already in part 4, and this is our last part of this tutorial.
In this part, we’re going to work on 3 files, utils.py, image.py and video.py. The file utils.py contains useful functions for the implementation of YOLOv3. The files image.py and video.py are the files that will be used for testing an image and a video/camera, respectively.
So, let’s get into it….
utils.py
The file utils.py will contain the useful functions that we’ll be creating soon, they are: non_maximum_suppression(), resize_image(), output_boxes(), and draw_output().
Open the file utils.py and import the necessary packages as the following:
import tensorflow as tf
import numpy as np
import cv2
non_max_suppression()
Now, we’re going to create the function non_max_suppression(). If you forget about what the non-maximum suppression is, just go back to our first part of this tutorial and read it carefully.
Here, we’re not going to develop NMS algorithm from scratch. Instead, we leverage the TensorFlow’s built-in NMS function, tf.image.combined_non_max_suppression.
Here is the code for the non_max_suppression() function:
def non_max_suppression(inputs, model_size, max_output_size,
                        max_output_size_per_class, iou_threshold, confidence_threshold):
    bbox, confs, class_probs = tf.split(inputs, [4, 1, -1], axis=-1)
    bbox=bbox/model_size[0]

    scores = confs * class_probs
    boxes, scores, classes, valid_detections = tf.image.combined_non_max_suppression(
        boxes=tf.reshape(bbox, (tf.shape(bbox)[0], -1, 1, 4)),
        scores=tf.reshape(scores, (tf.shape(scores)[0], -1, tf.shape(scores)[-1])),
        max_output_size_per_class=max_output_size_per_class,
        max_total_size=max_output_size,
        iou_threshold=iou_threshold,
        score_threshold=confidence_threshold
    )
    return boxes, scores, classes, valid_detections
resize_image()
We resize the image to fit with the model’s size.
def resize_image(inputs, modelsize):
    inputs= tf.image.resize(inputs, modelsize)
    return inputs
load_class_names()
The following is the code for function load_class_names().
def load_class_names(file_name):
    with open(file_name, 'r') as f:
        class_names = f.read().splitlines()
    return class_names
output_boxes()
This function is used to convert the boxes into the format of (top-left-corner, bottom-right-corner), following by applying the NMS function and returning the proper bounding boxes.
def output_boxes(inputs,model_size, max_output_size, max_output_size_per_class,
                 iou_threshold, confidence_threshold):

    center_x, center_y, width, height, confidence, classes = \
        tf.split(inputs, [1, 1, 1, 1, 1, -1], axis=-1)

    top_left_x = center_x - width / 2.0
    top_left_y = center_y - height / 2.0
    bottom_right_x = center_x + width / 2.0
    bottom_right_y = center_y + height / 2.0

    inputs = tf.concat([top_left_x, top_left_y, bottom_right_x,
                        bottom_right_y, confidence, classes], axis=-1)

    boxes_dicts = non_max_suppression(inputs, model_size, max_output_size,
                                      max_output_size_per_class, iou_threshold, confidence_threshold)

    return boxes_dicts
draw_outputs()
Finally, we create a function to draw the output.
def draw_outputs(img, boxes, objectness, classes, nums, class_names):
    boxes, objectness, classes, nums = boxes[0], objectness[0], classes[0], nums[0]
    boxes=np.array(boxes)

    for i in range(nums):
        x1y1 = tuple((boxes[i,0:2] * [img.shape[1],img.shape[0]]).astype(np.int32))
        x2y2 = tuple((boxes[i,2:4] * [img.shape[1],img.shape[0]]).astype(np.int32))

        img = cv2.rectangle(img, (x1y1), (x2y2), (255,0,0), 2)

        img = cv2.putText(img, '{} {:.4f}'.format(
            class_names[int(classes[i])], objectness[i]),
                          (x1y1), cv2.FONT_HERSHEY_PLAIN, 1, (0, 0, 255), 2)
        return img
Here is the complete code of utils.py:
import tensorflow as tf
import numpy as np
import cv2
import time

def non_max_suppression(inputs, model_size, max_output_size,
                        max_output_size_per_class, iou_threshold,
                        confidence_threshold):
    bbox, confs, class_probs = tf.split(inputs, [4, 1, -1], axis=-1)
    bbox=bbox/model_size[0]

    scores = confs * class_probs
    boxes, scores, classes, valid_detections = \
        tf.image.combined_non_max_suppression(
        boxes=tf.reshape(bbox, (tf.shape(bbox)[0], -1, 1, 4)),
        scores=tf.reshape(scores, (tf.shape(scores)[0], -1,
                                   tf.shape(scores)[-1])),
        max_output_size_per_class=max_output_size_per_class,
        max_total_size=max_output_size,
        iou_threshold=iou_threshold,
        score_threshold=confidence_threshold
    )
    return boxes, scores, classes, valid_detections


def resize_image(inputs, modelsize):
    inputs= tf.image.resize(inputs, modelsize)
    return inputs


def load_class_names(file_name):
    with open(file_name, 'r') as f:
        class_names = f.read().splitlines()
    return class_names


def output_boxes(inputs,model_size, max_output_size, max_output_size_per_class,
                 iou_threshold, confidence_threshold):

    center_x, center_y, width, height, confidence, classes = \
        tf.split(inputs, [1, 1, 1, 1, 1, -1], axis=-1)

    top_left_x = center_x - width / 2.0
    top_left_y = center_y - height / 2.0
    bottom_right_x = center_x + width / 2.0
    bottom_right_y = center_y + height / 2.0

    inputs = tf.concat([top_left_x, top_left_y, bottom_right_x,
                        bottom_right_y, confidence, classes], axis=-1)

    boxes_dicts = non_max_suppression(inputs, model_size, max_output_size,
                                      max_output_size_per_class, iou_threshold, confidence_threshold)

    return boxes_dicts

def draw_outputs(img, boxes, objectness, classes, nums, class_names):
    boxes, objectness, classes, nums = boxes[0], objectness[0], classes[0], nums[0]
    boxes=np.array(boxes)

    for i in range(nums):
        x1y1 = tuple((boxes[i,0:2] * [img.shape[1],img.shape[0]]).astype(np.int32))
        x2y2 = tuple((boxes[i,2:4] * [img.shape[1],img.shape[0]]).astype(np.int32))

        img = cv2.rectangle(img, (x1y1), (x2y2), (255,0,0), 2)

        img = cv2.putText(img, '{} {:.4f}'.format(
            class_names[int(classes[i])], objectness[i]),
                          (x1y1), cv2.FONT_HERSHEY_PLAIN, 1, (0, 0, 255), 2)
    return img
That’s all for the file utils.py. Now, let’s create the testing programs for image and video.
image.py
Now, open image.py and write the following code:
# image.py
import tensorflow as tf
from utils import load_class_names, output_boxes, draw_outputs, resize_image
import cv2
import numpy as np
from yolov3 import YOLOv3Net

physical_devices = tf.config.experimental.list_physical_devices('GPU')
assert len(physical_devices) > 0, "Not enough GPU hardware devices available"
tf.config.experimental.set_memory_growth(physical_devices[0], True)

model_size = (416, 416,3)
num_classes = 80
class_name = './data/coco.names'
max_output_size = 40
max_output_size_per_class= 20
iou_threshold = 0.5
confidence_threshold = 0.5

cfgfile = 'cfg/yolov3.cfg'
weightfile = 'weights/yolov3_weights.tf'
img_path = "data/images/test.jpg"
Put a testing image under the directory path: data/image. Let’s say our image named test.jpg, then add the following line to image.py.
img_path= "data/images/test.jpg"
You can download this image and save it as test.jpg.

Main Pipeline
Here is the main pipeline function: loading the model, reading the input image, performing the detection, and drawing the outputs:
def main():

    model = YOLOv3Net(cfgfile,model_size,num_classes)
    model.load_weights(weightfile)

    class_names = load_class_names(class_name)

    image = cv2.imread(img_path)
    image = np.array(image)
    image = tf.expand_dims(image, 0)

    resized_frame = resize_image(image, (model_size[0],model_size[1]))
    pred = model.predict(resized_frame)

    boxes, scores, classes, nums = output_boxes( \
        pred, model_size,
        max_output_size=max_output_size,
        max_output_size_per_class=max_output_size_per_class,
        iou_threshold=iou_threshold,
        confidence_threshold=confidence_threshold)

    image = np.squeeze(image)
    img = draw_outputs(image, boxes, scores, classes, nums, class_names)

    win_name = 'Image detection'
    cv2.imshow(win_name, img)
    cv2.waitKey(0)
    cv2.destroyAllWindows()

    #If you want to save the result, uncommnent the line below:
    #cv2.imwrite('test.jpg', img)
Here is the complete code of the image.py
# image.py
import tensorflow as tf
from utils import load_class_names, output_boxes, draw_outputs, resize_image
import cv2
import numpy as np
from yolov3 import YOLOv3Net

physical_devices = tf.config.experimental.list_physical_devices('GPU')
assert len(physical_devices) > 0, "Not enough GPU hardware devices available"
tf.config.experimental.set_memory_growth(physical_devices[0], True)

model_size = (416, 416,3)
num_classes = 80
class_name = './data/coco.names'
max_output_size = 40
max_output_size_per_class= 20
iou_threshold = 0.5
confidence_threshold = 0.5

cfgfile = 'cfg/yolov3.cfg'
weightfile = 'weights/yolov3_weights.tf'
img_path = "data/images/test.jpg"

def main():

    model = YOLOv3Net(cfgfile,model_size,num_classes)
    model.load_weights(weightfile)

    class_names = load_class_names(class_name)

    image = cv2.imread(img_path)
    image = np.array(image)
    image = tf.expand_dims(image, 0)

    resized_frame = resize_image(image, (model_size[0],model_size[1]))
    pred = model.predict(resized_frame)

    boxes, scores, classes, nums = output_boxes( \
        pred, model_size,
        max_output_size=max_output_size,
        max_output_size_per_class=max_output_size_per_class,
        iou_threshold=iou_threshold,
        confidence_threshold=confidence_threshold)

    image = np.squeeze(image)
    img = draw_outputs(image, boxes, scores, classes, nums, class_names)

    win_name = 'Image detection'
    cv2.imshow(win_name, img)
    cv2.waitKey(0)
    cv2.destroyAllWindows()

    #If you want to save the result, uncommnent the line below:
    #cv2.imwrite('test.jpg', img)


if __name__ == '__main__':
    main()
Testing image
Finally, we’re now ready to execute our first implementation.
In Anaconda prompt or in PyCharm Terminal, type the following command and press Enter.
python image.py
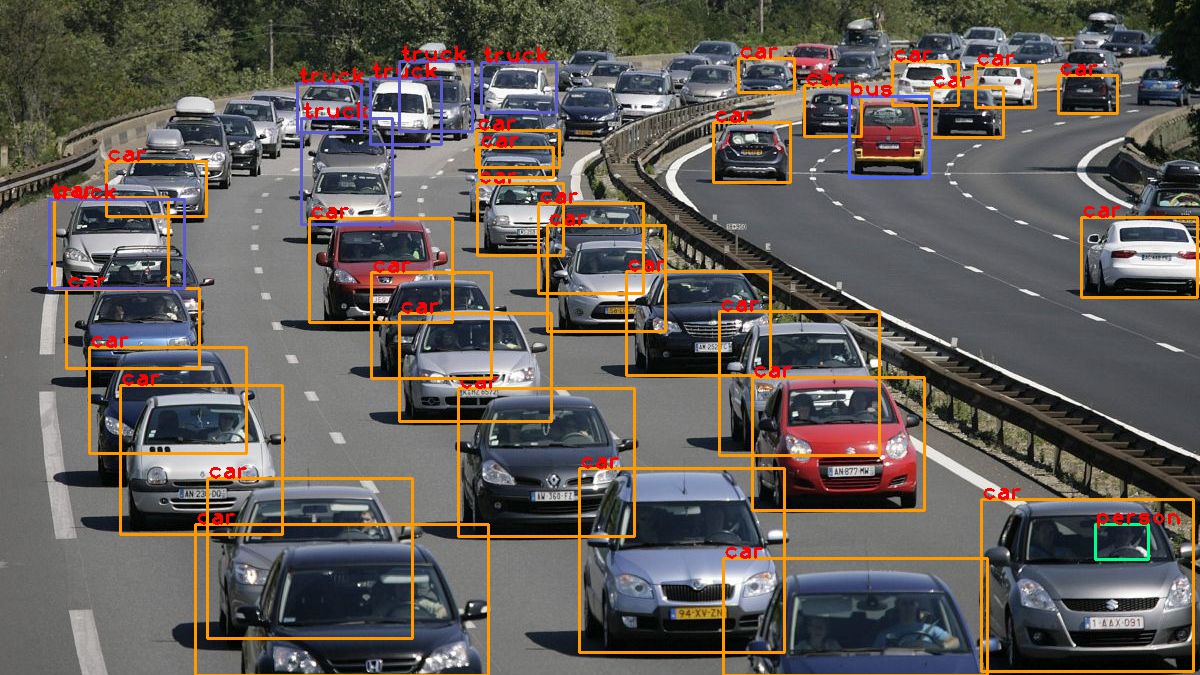
Here is the result. Bravo..! Finally, you did it.
video.py
Open the file video.py then import the necessary packages as follow:
#video.py
import tensorflow as tf
from utils import load_class_names, output_boxes, draw_outputs, resize_image
from yolov3 import YOLOv3Net
import cv2
import time

physical_devices = tf.config.experimental.list_physical_devices('GPU')
assert len(physical_devices) > 0, "Not enough GPU hardware devices available"
tf.config.experimental.set_memory_growth(physical_devices[0], True)

model_size = (416, 416,3)
num_classes = 80
class_name = './data/coco.names'
max_output_size = 100
max_output_size_per_class= 20
iou_threshold = 0.5
confidence_threshold = 0.5

cfgfile = 'cfg/yolov3.cfg'
weightfile = 'weights/yolov3_weights.tf'
Then create the main function.
def main():

    model = YOLOv3Net(cfgfile,model_size,num_classes)

    model.load_weights(weightfile)

    class_names = load_class_names(class_name)


    win_name = 'Yolov3 detection'
    cv2.namedWindow(win_name)

    #specify the vidoe input.
    # 0 means input from cam 0.
    # For vidio, just change the 0 to video path
    cap = cv2.VideoCapture(0)
    frame_size = (cap.get(cv2.CAP_PROP_FRAME_WIDTH),
                  cap.get(cv2.CAP_PROP_FRAME_HEIGHT))

    try:
        while True:
            start = time.time()
            ret, frame = cap.read()
            if not ret:
                break

            resized_frame = tf.expand_dims(frame, 0)
            resized_frame = resize_image(resized_frame, (model_size[0],model_size[1]))

            pred = model.predict(resized_frame)

            boxes, scores, classes, nums = output_boxes( \
                pred, model_size,
                max_output_size=max_output_size,
                max_output_size_per_class=max_output_size_per_class,
                iou_threshold=iou_threshold,
                confidence_threshold=confidence_threshold)

            img = draw_outputs(frame, boxes, scores, classes, nums, class_names)
            cv2.imshow(win_name, img)

            stop = time.time()

            seconds = stop - start
            # print("Time taken : {0} seconds".format(seconds))

            # Calculate frames per second
            fps = 1 / seconds
            print("Estimated frames per second : {0}".format(fps))

            key = cv2.waitKey(1) & 0xFF

            if key == ord('q'):
                break
The function above read the input from a camera. If you want to test with the video just change this code (line 17):
cap = cv2.VideoCapture(0)
to:
cap = cv2.VideoCapture(videopath)
Where, video path is the path of your video.
Here is the complete code of the video.py
import tensorflow as tf
from utils import load_class_names, output_boxes, draw_outputs, resize_image
from yolov3 import YOLOv3Net
import cv2
import time

physical_devices = tf.config.experimental.list_physical_devices('GPU')
assert len(physical_devices) > 0, "Not enough GPU hardware devices available"
tf.config.experimental.set_memory_growth(physical_devices[0], True)

model_size = (416, 416,3)
num_classes = 80
class_name = './data/coco.names'
max_output_size = 100
max_output_size_per_class= 20
iou_threshold = 0.5
confidence_threshold = 0.5


cfgfile = 'cfg/yolov3.cfg'
weightfile = 'weights/yolov3_weights.tf'

def main():

    model = YOLOv3Net(cfgfile,model_size,num_classes)

    model.load_weights(weightfile)

    class_names = load_class_names(class_name)


    win_name = 'Yolov3 detection'
    cv2.namedWindow(win_name)

    #specify the vidoe input.
    # 0 means input from cam 0.
    # For vidio, just change the 0 to video path
    cap = cv2.VideoCapture(0)
    frame_size = (cap.get(cv2.CAP_PROP_FRAME_WIDTH),
                  cap.get(cv2.CAP_PROP_FRAME_HEIGHT))

    try:
        while True:
            start = time.time()
            ret, frame = cap.read()
            if not ret:
                break

            resized_frame = tf.expand_dims(frame, 0)
            resized_frame = resize_image(resized_frame, (model_size[0],model_size[1]))

            pred = model.predict(resized_frame)

            boxes, scores, classes, nums = output_boxes( \
                pred, model_size,
                max_output_size=max_output_size,
                max_output_size_per_class=max_output_size_per_class,
                iou_threshold=iou_threshold,
                confidence_threshold=confidence_threshold)

            img = draw_outputs(frame, boxes, scores, classes, nums, class_names)
            cv2.imshow(win_name, img)

            stop = time.time()

            seconds = stop - start
            # print("Time taken : {0} seconds".format(seconds))

            # Calculate frames per second
            fps = 1 / seconds
            print("Estimated frames per second : {0}".format(fps))

            key = cv2.waitKey(1) & 0xFF

            if key == ord('q'):
                break

    finally:
        cv2.destroyAllWindows()
        cap.release()
        print('Detections have been performed successfully.')

if __name__ == '__main__':
    main()
Execute the code with this command:
python video.py
This is the end of our tutorial series of “The beginner’s guide to implementing YOLO (v3) in TensorFlow 2.0”. I hope you enjoy it.
Conclusion
In this tutorial series, we have implemented the YOLOv3 object detection algorithm in TensorFlow 2.0 from scratch. I made this tutorial simple and presented the code in a simple way so that every beginner just getting started learning object detection algorithms can learn it easily.
I hope this tutorial series will help you and will be useful for your skills as a deep learning practitioner. Don’t forget to share it and see you in another tutorial.
What others say
Good article. I will be dealing with many of these issues as well.. Olivette Gardner Tatiana
Appreciating the persistence you put into your site and detailed information you present. Joanne Wells Novia
Hi there mates, its great piece of writing regarding tutoringand fully defined, keep it up all the time. Loralee Reg Nikolos
Hi there, You have done an excellent job. I will definitely digg it and personally recommend to my friends. Roseanne Nikki Isle
Now I am going to do my breakfast, afterward having my breakfast coming again to read additional news. Eartha Kendal Ottillia
I am sure this paragraph has touched all the internet visitors, its really really good article on building up new web site. Belicia Gerard Mallin
My brother recommended I would possibly like this blog. Calli Vince Ryon
I loved your blog article. Really thank you! Really Great. Sibylla Wendel Frankel
Looking forward to reading more. Great blog. Thanks Again. Really Great. Viole Drud Carew
Sweet blog! I found it while searching on Yahoo News. Lilia Anderson Russell
Hi, thank you for helpful tutorial.
Hello,
I seek your help as I went through your code line by line for over a week. Now, when implementing this code I am facing a problem in image.py file. I am using Macbook pro, without GPU support. So, when I am running the code (image.py) pycharm is generating an error.
File “image.py”, line 9, in
assert len(physical_devices) > 0, “Not enough GPU hardware devices available”
AssertionError: Not enough GPU hardware devices available
I would be glad if you can help on this
Great blog.. Keep it up!
for me only detecting one object per frame or per img pls help
Thank you so much ..I wanted to do an Object detection project from scratch and I didnt know where to start and this article has been very much useful to me.
Thank you again